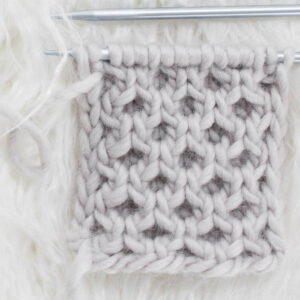
Mini Honeycomb Cable Stitch Swatch Instructions
The honeycomb cable stitch consists of 2 simple cables using 2 stitches for each one.Knit the honeycomb stitch on repeat to create a beautifully thick & cozy fabric.The mini honeycomb stitch is similar to the honeycomb stitch. The difference being that the honeycomb stitch uses 2-4 stitch cables and the mini honeycomb stitch use 2-2 stitch cables.
Equipment
- Knitting Needles (Recommended Size for Yarn)
- Cable Needle
- Darning Needle
- Scissors
Materials
- Any Yarn
Instructions
Knit flat using straight needles:
- CO in increments of 13 +1
- Row 1 (WS): *K1, P12* K1
- Row 2 (RS): P1 *[C2L, C2R] x3, P1*
- Row 3 (WS): *K1, P12* K1 (repeat row 1)
- Row 4 (RS): P1 *[C2R, C2L] x3, P1*
- Repeat rows 1 – 4 until desired length
Abbreviations
- * – * – repeat between *asterisks* to the end of the round
- BO – bind-off in pattern
- CO – cast-on (long-tail cast-on method)
- C2R – cable 2 right – slip 1 stitch to a cable needle and hold it in the back of your work, knit 1 stitch off the left needle and then knit the 1 stitch off the cable needl
- C2L – cable 2 left – slip 1 stitch to a cable needle and hold it in the front of your work, knit 1 stitch off the left needle and then knit the 1 stitch off the cable needle
- K – knit stitches (K1 means to knit 1 stitch)
- K1TBL – knit 1 stitch through the back loop
- P – purl stitches (P2 means to purl 2 stitches)
- RS – right side of work
- S1PW – slip one stitch purl-wise
- STS – stitches
- WS – wrong side of work
- WYIF – with yarn in front