How a Simple Rectangle Becomes a Knit Tee (Free Pattern)
This post may contain affiliate links. Please read my disclosure policy.
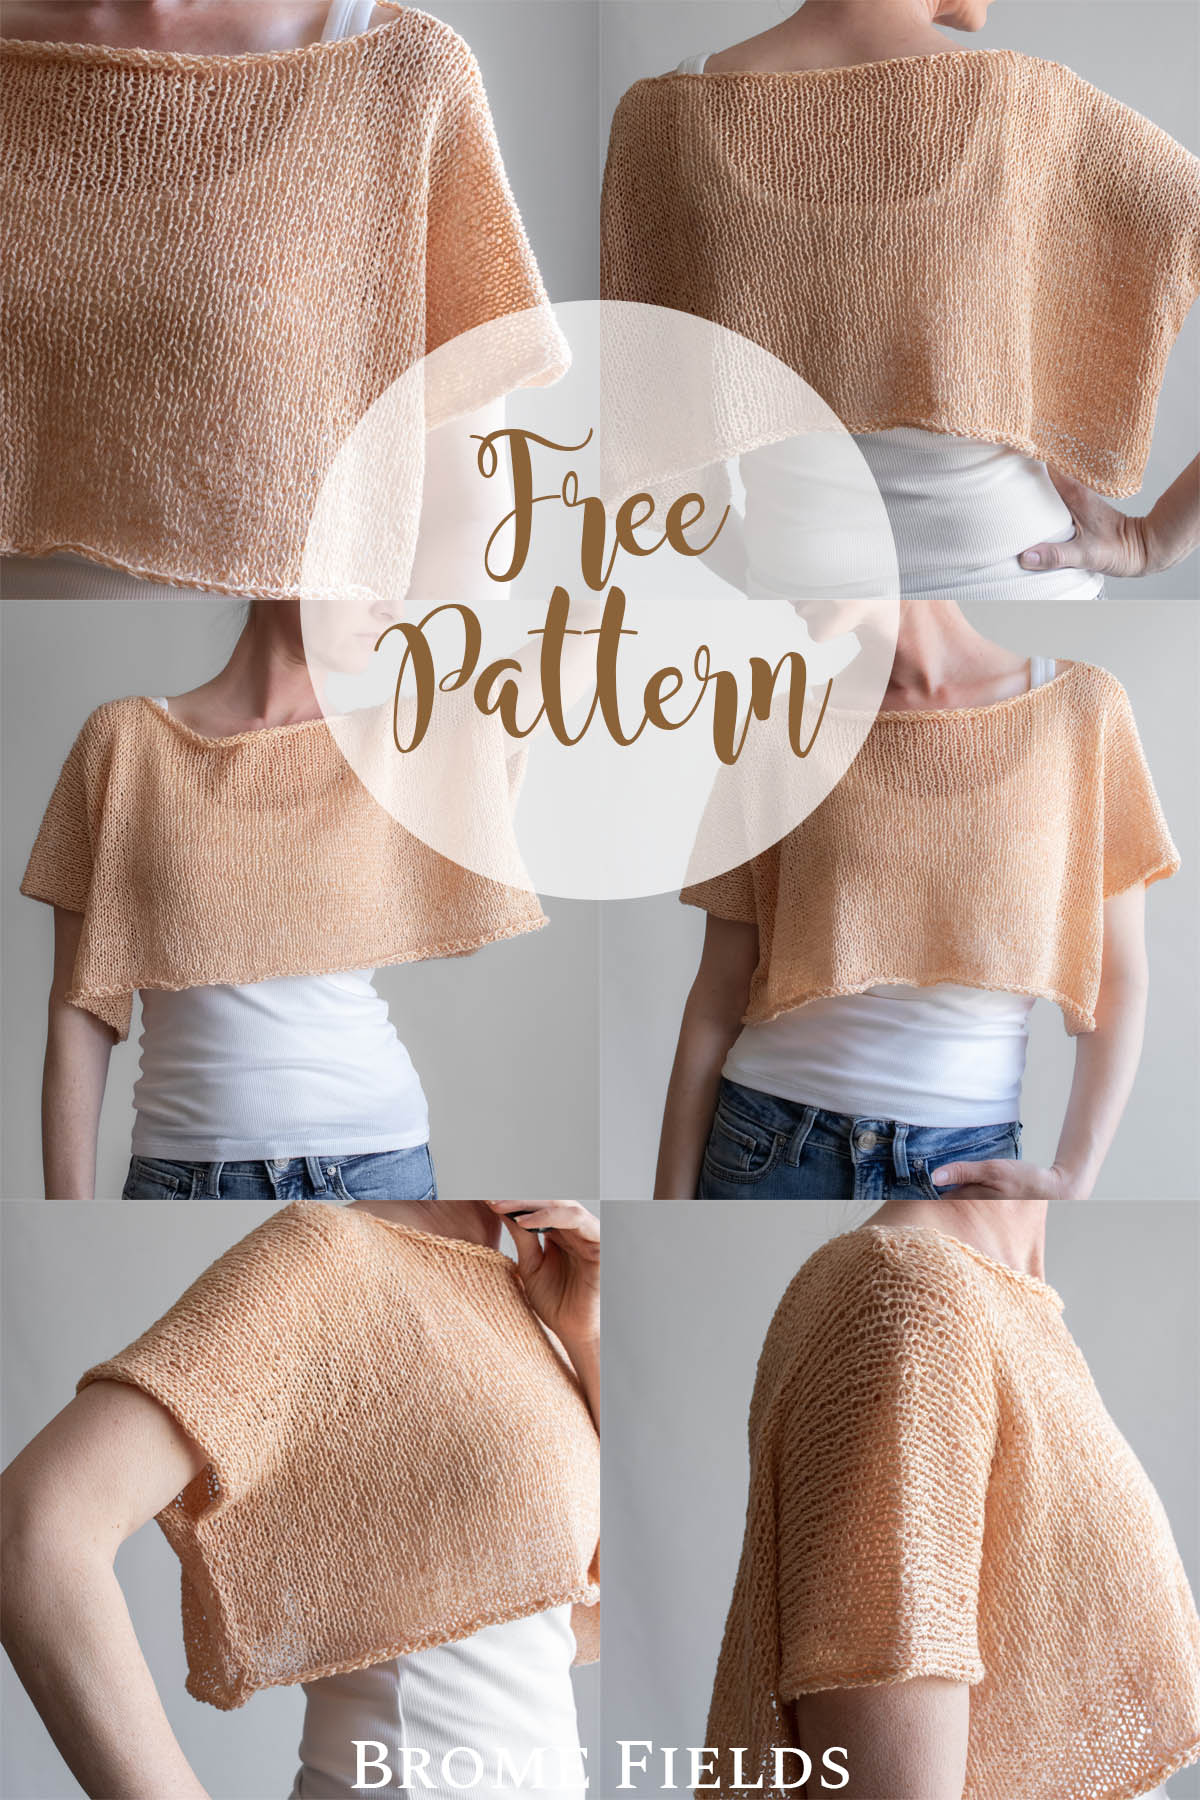
This free beginner knit tee pattern is worked as a single flat rectangle.
The Peach Iced Tee starts with one rectangle. You knit it flat, fold it in half, sew a short seam on each side, and suddenly you’re wearing a tee. That’s it. That’s the whole secret. One rectangle, two short seams… and no shaping.
This tee is a great example of what I design for the BFF Knitting Club every month. Simple construction, wearable results, no pattern you’ll regret. If you want two new patterns like this landing in your inbox every month… come join us →
About this Knitting Pattern
Sizes: XS (S, M, L, XL, 2XL, 3XL)
Pattern Format: Written Pattern, No Chart
Pattern Language: English
Skill Level: Beginner Friendly – if you can knit and purl, you can make this
PDF Format: Printer-Friendly
Techniques Used: Knit flat, knit and purl stitches, increases and bind-off for neck shaping, sewing seams
Pattern Name: Peach Iced Tee
How the Construction Works
The Peach Iced Tee is worked flat in stockinette stitch as a single piece, knit from hem to hem. You cast on at the bottom hem and knit straight up toward the neckline. At the halfway point, you bind off the center stitches to create the neck opening, then cast on those stitches again on the next row. From there you mirror the first half, knitting back down to the second hem and binding off. To finish, fold the piece in half at the shoulder, then sew a short seam on each side to form the sleeves.
What Skills You Need to Knit This Pattern
This beginner knit tee pattern uses the following knitting techniques:
Knit Flat – worked back and forth on circular needles, not in the round
Knit & Purl Stitches – the only two stitches used throughout
Increases & Bind-Off – used only at the neck opening for shaping
Sewing Seams – two short seams to create the sleeves
What You’ll Need to Knit This Pattern – Needles & Notions
Here’s everything you need to get started on the Peach Iced Tee:
- US 10 (6mm) Circular Needles with a 24″ (60cm) cable or longer – circular needles are used to accommodate the large number of cast-on stitches, not for knitting in the round
- Darning Needle – for weaving in ends and sewing the sleeve seams
- Garment Steamer – for blocking; this step is important for linen and significantly improves the drape and finish
- Scissors
Note: Use a larger needle than the yarn label suggests to create light & drapey fabric.
What Yarn Works Best for This Pattern
Yarn Weight: 3 – Light: DK, Light Worsted
Suggested Yarn: Berroco Indio, Clementine
Yardage: 307 – 714 yards (281 – 653 meters)
Yarn Substitute Options
Originally knit in Berroco Indio, a 100% linen DK weight yarn at 137 yds/50g. Look for something with a soft drape. Linen and cotton blends work beautifully for this airy summer style.
Fibra Natura Flax – nearly identical specs, 100% linen DK weight
Purl Soho Blackbird Linen – 100% French linen, light worsted/DK weight
BC Garn Organic Lino – lovely quality, linen DK
Lion Brand Touch of Linen – cotton/linen blend, budget-friendly
Juniper Moon Farm Zooey – cotton/linen blend, large skeins
Check out Yarnsub’s for more yarn substitutions.
Gauge for This Knitting Pattern
Gauge Guide: This visual reference can help you compare your fabric and gauge.
15 stitches and 23½ rows per 4″ (10cm) square, knit flat in stockinette stitch after steaming, using US 10 (6mm) circular needles.
Note: Gauge is measured after steaming. Linen relaxes significantly with steam, so always check your swatch after blocking rather than before.
Because this tee is sized by width rather than bust measurement, stitch gauge is particularly important here. Even a small difference, one or two stitches per four inches, will affect your finished width and could mean the difference between sizes. Row gauge matters too, as your length measurements depend on it.
If your gauge is off, try adjusting your needle size before casting on. Too few stitches per inch, you’ll want to go down a needle size… too many stitches per inch, you’ll want to go up a needle size.
What Size is the Sample in the Photos?
The sample shown is a size Medium, knit in Berroco Indio in Clementine.
Finished measurements before seaming: 29″ wide x 25″ long (70cm x 60cm)
Finished measurements after seaming: 29″ wide x 12½″ long (70cm x 30cm)
Weight: 5.5oz (155g)
Model details: 5’9″ (175cm) tall, 130lbs (59kg), 35″ (88cm) bust, 25″ (63cm) waist (wearing size Medium.)
This tee is designed with approximately 23″ of positive ease, meaning it is intentionally oversized and boxy. If you prefer an extra roomy fit, size up. If you prefer it slightly less oversized, size down.
Size Chart
Choose your size based on your preferred finished width rather than your bust measurement. This tee is sized by how wide you want it to be, not how closely it fits.
| Size | W” | x | L” | # of CO STS (width) | Skeins Needed | Meters Needed | Yards Needed |
| XS | 25 | x | 21 | 99 | 3 | 281 | 307 |
| S | 27 | x | 23 | 105 | 3 | 332 | 363 |
| M | 29 | x | 25 | 111 | 4 | 388 | 424 |
| L | 31 | x | 27 | 117 | 4 | 447 | 489 |
| XL | 33 | x | 29 | 123 | 5 | 512 | 559 |
| 2XL | 35 | x | 31 | 129 | 5 | 580 | 634 |
| 3XL | 37 | x | 33 | 135 | 6 | 653 | 714 |
Before You Begin – Quick Notes
This pattern is knit flat, back and forth – not in the round
Not reversible – the right and wrong sides are distinct
Steam block as you go for accurate measurements
Knitting Abbreviations
*– * – repeat between the asterisks
BO – bind-off in pattern
CO – cast-on (long-tail cast-on method)
K – knit stitches (K1 means to knit 1 stitch)
K1TBL – knit 1 stitch through the back loop
P – purl stitches (P2 means to purl 2 stitches)
RS – right side
S1PW – slip one stitch purl-wise
STS – stitches
WS – wrong side
WYIF – with yarn in front
Download & Print this Pattern
Do you enjoy working from a paper copy? Get the downloadable, printer-friendly PDF completely ad-free.
That way you can have lifetime access to it and download it to any device and view it from anywhere, without ads.
Want a More Polished Finish? (Optional)
If you’re a beginner or prefer to keep it simple? Skip this section entirely, the pattern works beautifully without it.
For a more polished sleeve edge, use the following technique on the unsewn portion of each side.
On the Wrong Side (WS): With yarn in front, slip stitch purlwise, (WYIF S1PW) for the first and last stitches.
On the Right Side (RS): K1 through the back loop (K1TBL) for the first and last stitches.
When to start and stop:
1st half: Begin this technique when your work measures your sleeve seam length from the cast-on edge. Continue to the end of the 1st half.
2nd half: Continue this technique until your remaining length equals your sleeve seam length, then stop.
Sleeve seam length measurements:
XS 4″ (10 cm), S 4½” (11.5 cm), M 5″ (12.5 cm), L 5½” (14 cm), XL 6″ (15 cm), 2XL 6½” (16.5 cm), 3XL 7″ (18 cm)
Pattern Instructions
Cast on the number of stitches for your chosen size.
Save this pattern for later!
XS (99), S (105), M (111), L (117), XL (123), 2XL (129), 3XL (135)
1st Half:
Row 1 (WS): *P* (Purl all the stitches in this row)
Row 2 (RS): *K* (Knit all the stitches in this row)
Repeat rows 1-2 for the 1st half of the full length:
XS 10½” (27cm), S 11½” (29.5cm), M 12½” (32cm), L 13½” (34.5cm), XL 14½” (37cm), 2XL 15½” (39.5cm), 3XL 16½” (42cm)
How the Create the Neck Opening
Decrease for the neck on a WRONG side row:
Notes:
- BO more stitches in the center if you’d like a wider neckline.
- It’s important to bind-off in the K1, P1 pattern, or another stretchy cast-off, so that the neckline is stretchy and it’ll easily slip on and off. And it helps keep it from rolling.
XS: P33 *BO in the K1, P1 pattern for 33 STS* P33
S: P35 *BO in the K1, P1 pattern for 35 STS* P35
M: P37 *BO in the K1, P1 pattern for 37 STS* P37
L: P39 *BO in the K1, P1 pattern for 39 STS* P39
XL: P41 *BO in the K1, P1 pattern for 41 STS* P41
2XL: P43 *BO in the K1, P1 pattern for 43 STS* P43
3XL: P45 *BO in the K1, P1 pattern for 45 STS* P45
Increase for the neck on a RIGHT side row:
Notes:
- I used a backwards loop to increase my stitches.
- Make sure your total stitch count matches your cast-on number.
- Optional: place a stitch marker at the beginning and end of the increased stitches.
XS: K33 *Increase 33 STS* K33
S: K35 *Increase 35 STS* K35
M: K37 *Increase 37 STS* K37
L: K39 *Increase 39 STS* K39
XL: K41 *Increase 41 STS* K41
2XL: K43 *Increase 43 STS* K43
3XL: K45 *Increase 45 STS* K45
Row after the increase (this row only): Purl the first set of purl stitches, *K1, P1* across the increased stitches, purl the remaining stitches. Note: The K1, P1 on the neck stitches helps prevent rolling and adds a little stretch to the neckline.
2nd Half (resume stockinette):
Row 1 (RS): *K* (Knit all the stitches in this row)
Row 2 (WS): *P* (Purl all the stitches in this row)
Repeat rows 1-2, for the 2nd half of the full length:
XS 10½” (27cm), S 11½” (29.5cm), M 12½” (32cm), L 13½” (34.5cm), XL 14½” (37cm), 2XL 15½” (39.5cm), 3XL 16½” (42cm)
BO loosely in the K1, P1 pattern, or your favorite stretchy bind-off.
Pro tip: Use a needle size 2 sizes larger than you cast-on for a loose and consistent bind-off edge.
How to Finish the Peach Iced Tee
How to Create the Sleeves:
Fold it in half width-wise, with the neckline at the top, wrong side facing you.
Sew from the corner upward approx.:
XS 4″ (10 cm), S 4½” (11.5 cm), M 5″ (12.5 cm), L 5½” (14 cm), XL 6″ (15 cm), 2XL 6½” (16.5 cm), 3XL 7″ (18 cm)
Repeat on the other side.
Weave in all your ends.
Steaming:
Don’t skip this step. Steaming really pulls everything together, turning it into something you’ll feel proud to wear again and again.
Lightly steam the finished piece to even out stitches and encourage a relaxed drape. Steaming helps smooth out uneven tension, soften the fabric, and allows the garment to relax into its final shape and measurements before wearing. This final step gives the piece its signature drape and finish, transforming it from handmade to beautifully finished.
FAQ – Frequently Asked Questions
Is this pattern good for beginners? Yes. The Peach Iced Tee is one of the most beginner-friendly garment patterns available. If you can knit and purl flat, you have everything you need to make this tee. There is no knitting in the round, no complex shaping, and no chart to follow.
What is the easiest size to start with? Any size works equally well for a beginner, the construction is identical across all sizes. Simply choose your size based on your preferred finished width and follow the stitch counts for that size throughout.
Can I substitute the yarn? Yes. Look for a DK or light worsted weight yarn with good drape. Linen and cotton blends work beautifully for this style. Avoid anything too stiff or too stretchy, this pattern relies on drape for its signature look.
Do I need to knit a gauge swatch? Yes, and measure it after steaming. Linen relaxes significantly with steam, so your pre-blocking swatch will not give you an accurate read. Because this pattern is sized by width, being off by even a stitch or two per inch will affect your finished measurements.
Why do I need circular needles if I’m not knitting in the round? Circular needles are used to accommodate the large number of cast-on stitches. You are still knitting flat, back and forth — the circular needle simply gives your stitches enough room to sit comfortably.
How difficult is the neck shaping? The neck shaping is minimal and straightforward. At the halfway point you bind off the center stitches, then increase them back on the next row. That’s the only shaping in the entire pattern.
Do I need to block this pattern? Yes, and steam blocking is strongly recommended over wet blocking for linen. Steam as you go for more accurate measurements during knitting, then give the finished piece a final steam to even out stitches and encourage drape.
How long does this pattern take to knit? This varies by knitter and size, but because it is worked in stockinette on a larger needle than the yarn weight suggests, it works up relatively quickly for a garment pattern.
Save it for Later
- Want a printable version? The PDF includes a full schematic and printer-friendly layout Grab it here.
- Save it to your Ravelry Library!
- Pin-it to Pinterest for later.
Share your Peach Iced Tee
When you’re finished, we want to see it! Tag your photos with #bromefields and give us a follow at @bromefields on Instagram and Facebook. We love seeing all your creations in different color and fiber combinations!
Want More Patterns Like This?
If you loved this pattern, you’ll feel right at home in the BFF Knitting Club. Every month I curate two new patterns plus a mini-magazine, so you always know exactly what to knit next. No scrolling, no decision fatigue. Just open and cast on. Join here →