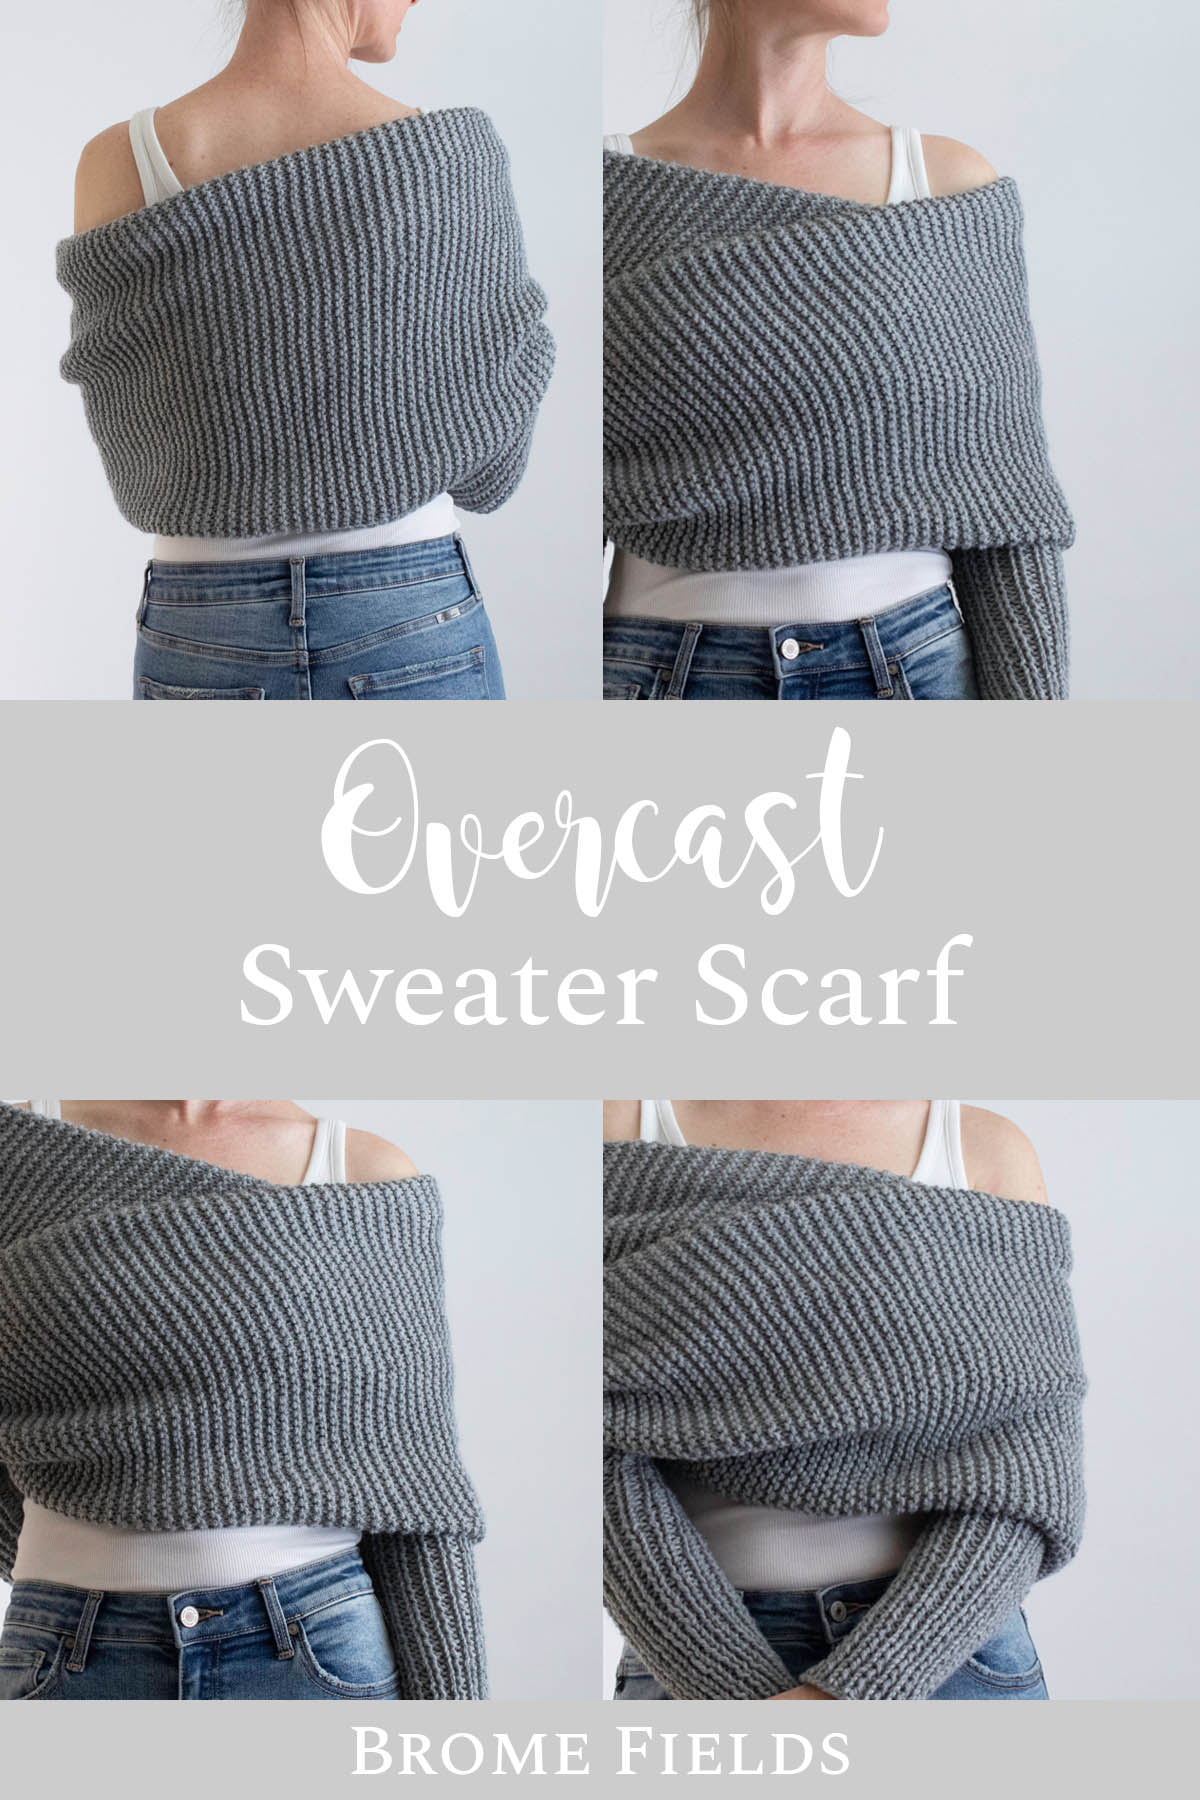
Free Garter Stitch Sweater Scarf Pattern (Knit Flat for Beginners)
This post may contain affiliate links. Please read my disclosure policy.
If you’re looking for an easy wearable project, this free garter stitch sweater scarf knitting pattern is a great place to start. It’s designed to be easy to follow while still creating a beautiful piece you’ll reach for again and again. Knit flat using basic knit stitches, it’s a relaxing beginner-friendly project that’s perfect for slow mornings, cool evenings, or everyday comfort.
This version is knit flat, making it simple to follow and easy to customize as you go. Grab the printable version with both knit flat and knit-in-the-round options
This sweater scarf is a great example of what I design for the BFF Knitting Club every month. Simple construction, wearable results, no pattern you’ll regret. If you want two new patterns like this landing in your inbox every month… come join us →
About the Pattern
This sweater scarf is knit flat from side to side, starting at one sleeve and working across the body to the other. You’ll begin with a simple ribbed cuff, increase your stitches to form the wider body, then knit the center in garter stitch for a soft, drapey feel. Once the length feels right, you’ll decrease back down, finish the second sleeve, and seam to create the sleeves. It uses basic knit and purl stitches with simple shaping, making it an easy, flexible project you can adjust so you can find your perfect fit.
Sizes: XS (S, M, L, XL, 2XL, 3XL)
Pattern Format: Written Pattern, No Chart
Pattern Language: English
Skill Level: Advanced Beginner*
PDF Format: Printer Friendly
Pattern Name: Overcast
*The only thing making this an “Advanced” knitting pattern is that it calls for increase/decrease stitches going from the wrist to body sections, other than that, it’s all knit & purl stitches.
Techniques
2 versions are included!
Here are some of the knitting skills you need to know before getting started:
Knit Flat Version:
Knit & Purl Stitches
Increase & Decrease Stitches
Sew Seams
Knit in the Round Version:
Knit & Purl Stitches
Increase & Decrease Stitches
Magic Loop Method
Materials
Yarn Weight: Chunky
Suggested Yarn: Berroco Vintage Chunky
Yardage: 298 – 542 yards (272 – 496 meters)
Alternative Yarn Substitute Options:
- Cascade 128 Superwash
- Knit Picks Brava Bulky
- Scheepjes Chunky Monkey
- Estelle Chunky
Check out Yarnsub’s for more yarn substitutions.
Needles & Notions
Two needle sizes are used to create structured sleeves and a softer, drapier body.
US 10 (6mm) Circular Needles with a 32” (80cm) Cable, or longer
US 10.5 (6.5mm) Circular Needles with a 32” (80cm) Cable, or longer
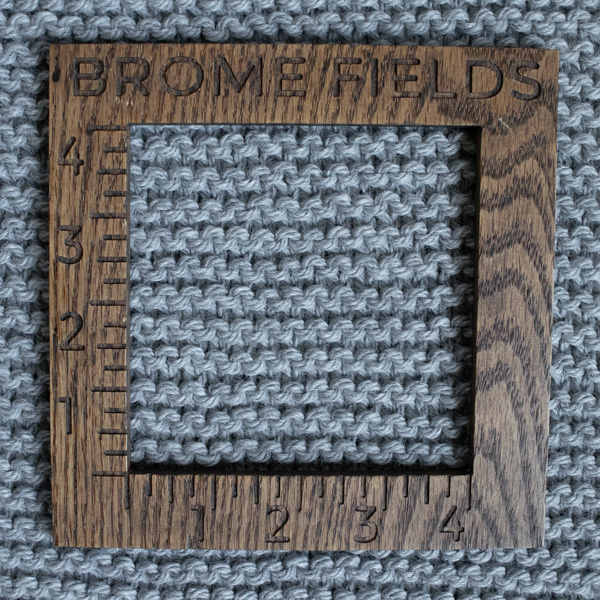
Gauge Guide:
This visual reference can help you compare your fabric and gauge.
15 STS & 22 rows per 4” (10cm) square, knit flat in the garter stitch after steaming, using US 10.5 (6.5mm) circular needles.
Model Details
Height: 5’9″ (175cm). Weight: 130lbs (59kg). Bust: 35″ (88cm). Waist: 25″ (63cm)
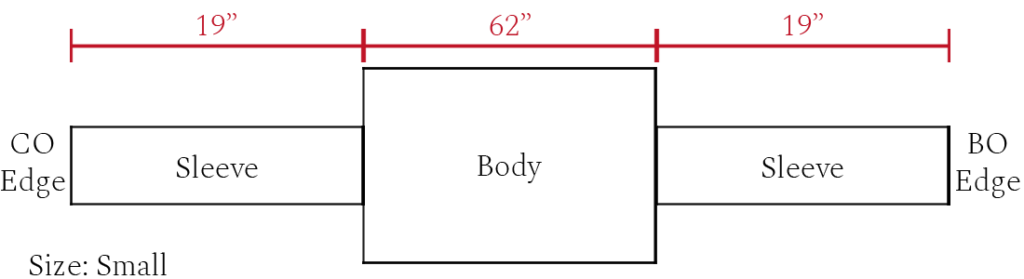
Finished Measurements, Size Small:
# of CO STS: 30
Weight: 1 lb 2.3oz (250g)
Total measurements, after steaming: 16″ x 100″ (41 x 254cm)
Body measures: 16″ x 62″ (41 x 157cm)
Sleeve measures: 6″ x 19″ (15 x 48cm)
Videos
Click here to watch the “Sweater Scarf“ video tutorial.
Click here to watch “How to Put it On” short video.
Notes
- Reversible.
- Knit flat from side to side.
- Knit using the garter & rib stitch.
- Knit flat, back & forth on circular needles, which are used to accommodate the large number of stitches, do not join in the round.
Customization & Fit
This piece is designed for a relaxed, draped fit rather than a structured sweater fit. The goal is comfort, movement, and effortless layering.
Keep in mind, I’m 5’9″, so if you’re knitting this for someone closer to 5’4″, you may want to subtract a few inches from the sleeve length and/or body length for a better fit.
Fun fact: According to Scientific American, a person’s arm span is roughly equal to their height. With that in mind, you may want to knit more or fewer rows than recommended in the size chart depending on your height and wingspan.
The “Length of Body” measurements listed in the size chart are after steaming. I lightly steam-blocked this piece as I went so I could try it on and adjust the length as needed. Steaming relaxes the stitches, improves drape, and gives you a more accurate idea of the finished fit. Honestly, it also makes the fabric feel amazing — soft, relaxed, and immediately wearable.
If you’re unsure, I highly recommend:
lightly steaming as you go
trying it on frequently
adjusting length based on your body and comfort
This is your handmade piece — make it fit you.
Common Customizations:
Shorter sleeves for petite knitters
Longer sleeves for taller frames
Longer body length for taller knitters
Extra length through the body for larger busts
Add more drape by knitting additional rows
Prefer a snugger fit? Knit fewer rows
Like oversized layers? Size up for extra ease
Sizes
| Size | Sleeve Circ. | x | Total Length | # of CO STS | Lengthof body | Skeins Needed | Meters Needed | Yards Needed |
| XS | 5 1/2″ | x | 95″ | 28 | 60″ | 3 | 272 | 298 |
| S | 6″ | x | 100″ | 30 | 62″ | 3 | 313 | 342 |
| M | 6 1/2″ | x | 102″ | 32 | 64″ | 3 | 345 | 378 |
| L | 7″ | x | 104″ | 34 | 66″ | 4 | 379 | 415 |
| XL | 7 1/2″ | x | 108″ | 38 | 68″ | 4 | 422 | 461 |
| 2XL | 8″ | x | 110″ | 40 | 70″ | 4 | 458 | 501 |
| 3XL | 8 1/2″ | x | 112″ | 42 | 74″ | 4 | 496 | 542 |
Measurements:
Sleeve Circ. = sleeve circumference.
Total Length = sleeve-to-sleeve length.
Length of Body = flat section between the sleeves.

Knitting Abbreviations
All are capitalized throughout the pattern for ease of reading.
*– * – repeat instructions between the asterisks
BO – bind-off in pattern
CO – cast-on (long-tail cast-on method)
INC1 – increase 1 stitch (I used a backwards loop)
K – knit stitches (K1 means to knit 1 stitch)
K1TBL – knit 1 through back loop
K2TOG – knit 2 stitches together
P – purl stitches (P2 means to purl 2 stitches)
RS – right side
S1PW – slip 1 purl-wise
STS – stitches
WS – wrong side
WYIF – with yarn in front
Save it for Later
- Want a printable version? Grab the ad-free PDF here and knit cozy anywhere — no scrolling required.
- Save it to your Ravelry Library!
- Pin-it to Pinterest for later.
Download & Print this Pattern
Want to knit this in the round instead?
The ad-free PDF includes both versions so you can choose the method you prefer. Get the downloadable, printer-friendly PDF completely ad-free.
Pattern Instructions
Starting at the beginning of the first sleeve.
Using US 10 (6mm) circular needles CO 28 (30, 32, 34, 38, 40, 42) STS for sizes XS (S, M, L, XL, 2XL, 3XL) using the long tail cast-on method, Italian cast-on or your favorite stretchy cast-on method. See the Size Chart section above for more details.
Sleeve Rib Section (All Sizes):
All Rows: *K1, P1*
Repeat for approx. 19″ (48cm), or desired length (it’ll loosen & relax when steamed).
Feel free to customize the length to suit your body and preferred fit.
What it should look like at this stage:
The photos below show the piece in its finished form. When knitting flat, your stitches will look similar and width will be proportional, but will remain flat until the sleeves are seamed.
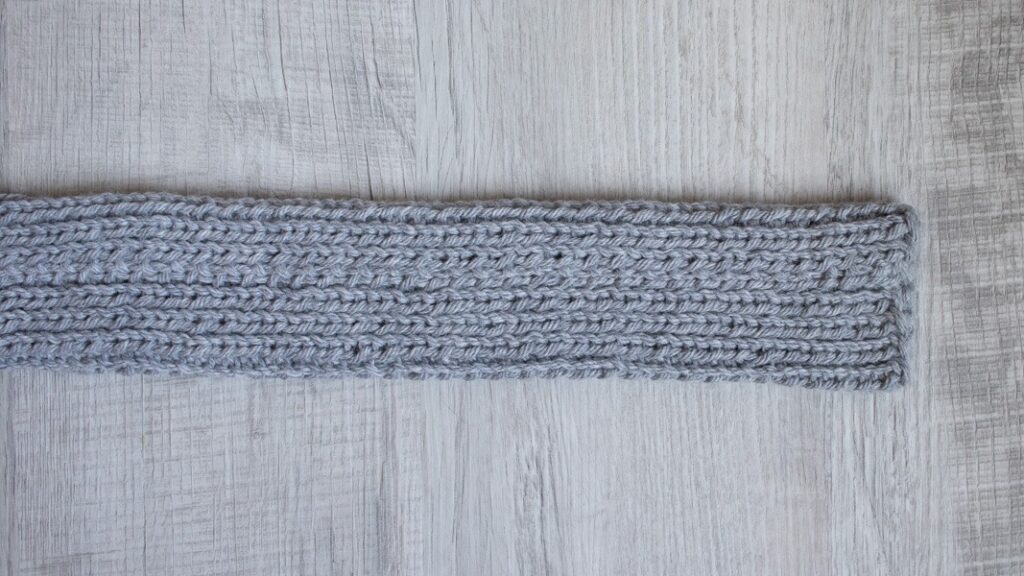
At this stage, the piece will look long, narrow, and flat, with ribbing. This is how it should look before shaping the body. (Later this section will be seamed creating the sleeve.)
Increase Row (Read This Section Before You Knit the Row):
Next Row: *INC1, K1, INC1, P1*, doubling the number of stitches.
On this row, you’re increasing one stitch, using a backwards loop, between every existing stitch. This means that for each knit or purl stitch you work, you’ll also add an increase beside it. By the end of the row, your stitch count will be doubled.
Written out step by step:
Increase 1 stitch
Knit 1 stitch
Increase 1 stitch
Save this pattern for later!
Purl 1 stitch
Then repeat that exact sequence across the entire row.
By increasing between each stitch, the fabric widens quickly to create the body section.
Example: If you cast on 20 stitches, you will have 40 stitches after the increase row.
Pause here and count your stitches before continuing. Your stitch count should be exactly double your cast-on number before moving on. If it isn’t, it’s much easier to fix it now than later.
Here’s a video tutorial for this increase row if you’d like to see it worked step by step.
First 6 rows of the body (garter stitch):
Advanced Version:
Row 1, 3, 5: WYIF S1PW *K* WYIF S1PW
Row 2, 4, 6: K1TBL *K* K1TBL
Simple Version:
Rows 1-6: *K* knit all stitches
What it should look like at this stage:
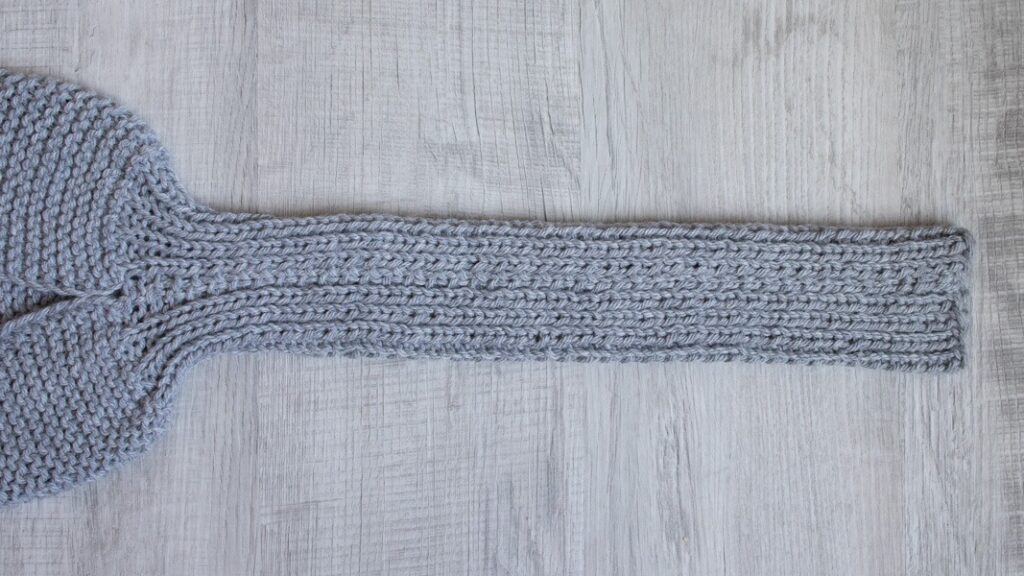
After the increase row, the fabric will widen noticeably, forming the body section. This is the expected transition from sleeve to body.
Body (garter stitch):
Needle Change: Switch to US 10.5 (6.5mm) circular needles. Switching to larger needles creates a softer, drapier body section while keeping the sleeves structured.
Advanced Version:
Row 1: WYIF S1PW *K* WYIF S1PW
Row 2: K1TBL *K* K1TBL
Simple Version:
All Rows: *K* knit all stitches
Repeat rows for 60″ (62, 64, 66, 68, 70, 74) for sizes XS (S, M, L, XL, 2XL, 3XL), or until desired length minus 2″ (4cm), measured from the end of the sleeve rib section across the body only. Give it a light steam and slip it on while you’re knitting. You’ll get a much better feel for the final fit. Feel free to customize the length to suit your body and style.
What it should look like at this stage:
This section may feel slow and take longer than expected, and that’s normal. The body needs enough length to wrap comfortably around your shoulders while still staying in place. Steam and try it on as you go until the length feels just right for you.
Last 6 rows of the body (garter stitch):
Needle Change: Switch back to US 10 (6mm) circular needle before beginning the second sleeve rib section. This creates a firmer fabric that matches the first sleeve.
Advanced Version:
Row 1, 3, 5: WYIF S1PW *K* WYIF S1PW
Row 2, 4, 6: K1TBL *K* K1TBL
Simple Version:
Rows 1-6: *K* knit all stitches
Decrease Row:
Next Row: *K2TOG* (knit 2 stitches together throughout the row.) At the end of the row you should have the same number of stitches you cast on 28 (30, 32, 34, 38, 40, 42) for sizes XS (S, M, L, XL, 2XL, 3XL).
Example: If you CO 32 STS, you should have 32 STS after the decrease row.
Pause here and count your stitches before continuing. Your stitch count should be exactly the same as your number of cast-on stitches.
Sleeve Rib Section (All Sizes):
All Rows: *K1, P1*
Repeat for approx. 19″ (48cm), or desired length (it’ll loosen & relax when steamed). Knit this section to match the length of the first sleeve.
Bind-Off
BO, on a right side row, in the K1, P1 rib pattern using a medium, even tension. However, avoid binding off too loosely, as this can cause the edge to flare.
If you prefer a professional edge, the Italian tubular BO is a great option.
You’re almost there. At this point, you’ll have two matching ribbed sleeves at either end of the scarf body. Once the sleeves are seamed, the finished piece will come together beautifully.
Seam Sleeves:
This seam closes the underside of each sleeve. Use a tapestry needle and the same yarn for seaming to keep the finish seamless and flexible.
Lay the piece flat with the wrong side facing up. Fold each ribbed section in half. At the cast-on end, bring the first and last stitches together and seam along the ribbed section to form the first sleeve, using the mattress stitch.
Repeat this process at the bind-off end to form the second sleeve.
Weave in the ends.
Steaming:
Don’t skip this step. Steaming really pulls everything together, turning it into something you’ll feel proud to wrap up in again and again.
Lightly steam the finished piece to even out stitches and encourage a relaxed drape. Steaming helps smooth out uneven tension, soften the fabric, and allows the garment to relax into its final shape and measurements before wearing. This final step gives the piece its signature drape and finish, transforming it from handmade to beautifully finished.
What it should look like at this stage:
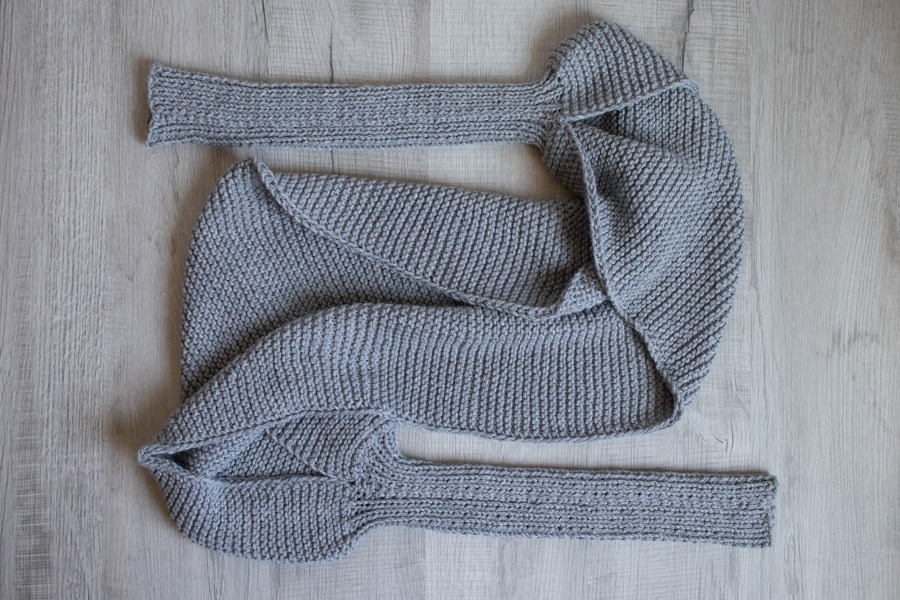
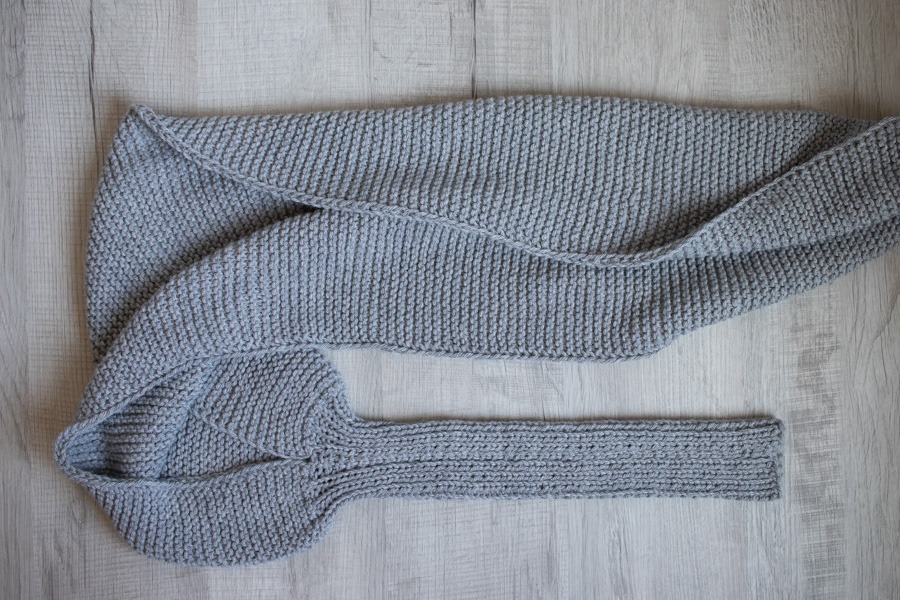
What is a Garter Stitch Sweater Scarf?
A garter stitch sweater scarf is a long, rectangular knitted wrap with a sleeve on each end. It’s knit from side to side — starting at one wrist, widening through the body, and narrowing back down to the second wrist. Once finished, the sleeve ends are seamed to create sleeves for your arms to slip through, transforming a simple rectangle into a wearable layering piece.
What makes this version different from other sweater scarves is the stitch. The body is worked in garter stitch — knitting every row — which creates a lovely squishy texture with natural stretch and incredible drape. It’s warmer and has more stretch than stockinette, softer at the edges, and forgiving of uneven tension in a way that makes it ideal for beginner knitters.
The sleeves are worked in a simple rib stitch to keep things snug and stretchy at the wrist, and two different needle sizes give the body that soft, relaxed feel you’ll want to wrap yourself in all season long. It looks like something you’d find in a boutique. It knits up like a beginner project. That’s the magic of it.
Frequently Asked Questions
Is this pattern really beginner friendly?
Yes. The construction is straightforward — you knit one long flat piece from sleeve to sleeve, with one increase row and one decrease row to shape the body. Everything else is garter stitch or rib stitch. The only techniques you need are knit, purl, a simple increase, and a basic decrease. If you’ve knitted a scarf before, you can knit this.
What yarn is used in the Overcast Sweater Scarf?
The sample is knit in Berroco Vintage Chunky in Smoke, a category 5 bulky weight yarn with a wool, acrylic, and nylon blend. It has a beautiful drape and a slightly elevated feel compared to a standard acrylic. That said, any category 5 bulky weight yarn will work — see the yarn substitution section above for alternatives.
How long does this sweater scarf take to knit?
Most knitters finish this in a weekend — roughly 10 to 15 hours depending on your pace and the size you’re knitting. The garter stitch body section is the longest stretch, but it’s also the most meditative part of the knit. Put on a podcast and enjoy it.
Do I need circular needles?
Yes, circular needles are recommended for the body section because of the high stitch count after the increase row. You don’t join in the round — you knit back and forth flat. The circular cable just gives your stitches room to breathe.
Can I knit this in a different weight yarn?
The pattern is written for category 5 bulky weight yarn. Substituting a different weight will affect your gauge and finished measurements, so if you go up or down in weight you’ll want to swatch and adjust accordingly.
What sizes are available?
The Overcast Sweater Scarf is available in seven sizes from XS to 3XL. See the size chart above for full measurements and yardage requirements.
Ready to Cast On?
Grab your yarn, switch on something good to listen to, and cast on. The Overcast Sweater Scarf is one of those projects that feels as good to make as it does to wear — steady, rhythmic rows that build into something genuinely beautiful. Take it slowly, steam as you go, and don’t skip the final steam at the end. That last step is what pulls everything together.
Share Your Overcast Sweater Scarf
I’d love to see your progress! Share your photos on Instagram and tag @bromefields and use #bromefields in the caption so the whole community can find your version too.
Join the BFF Knitting Club
If you loved this pattern, the BFF Knitting Club was made for you. Every month, members receive a curated issue of Knit Yourself Cozy delivered straight to their inbox — packed with new patterns, cozy inspiration, and the kind of knitting content worth slowing down for.
Join the BFF Knitting Club →