How to Knit a Simple Poncho Sweater
This post may contain affiliate links. Please read my disclosure policy.
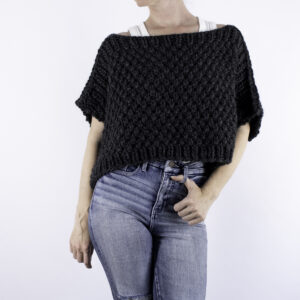
A cute chunky poncho sweater to wear when the weather is somewhere between hot and cold. Each side is knit from top to bottom and then seamed together. It’s a simple pattern that uses only knit and purl stitches!

About the Pattern
Available Sizes: 7 (XS – 3XL)
Pattern Format: Written Pattern, No Chart
Pattern Language: English
Skill Level: Beginner
PDF Format: Printer-Friendly
Pattern Name: Frosty Moon
I’m loving these poncho sweaters! I wanted a simple sweater that’s relatively quick to knit with lots of squishy texture!
I’m so glad that the boxy look is in style, it’s just comfy! So, I made this poncho a little oversized so it’s super cozy.
I hope you enjoy this new pattern.
Happy knitting 🖤!
Techniques
Here are some of the knitting skills you need to know before getting started:
Knit Flat
Knit & Purl Stitches
Sew Seams
For this poncho pattern you simply knit 2 rectangles, from top to bottom and then seam them together. No increase stitches, no decrease stitches, just knit and purl stitches!
Yarn & Substitutions
Yarn Weight: Super Bulky
Yardage: 236 – 668 yards (216 – 611 meters)
Suggested Yarn: Cloudborn Fibers Highland Roving
Alternative Yarn Substitute Options:
Unfortunately, this chunky yarn is no longer available. So, here’s a list of alternative yarns:
I’ve worked with the first 3 options on multiple projects and they’re almost identical to the yarn used for the poncho, so they’re great options!
- We Are Knitters The Wool
- Wool and the Gang Crazy Sexy Wool
- Yarnalia Softy
- Malabrigo Rasta
- Madelinetosh A.S.A.P.
Check out Yarnsub’s recommendations for yarn substitution recommendations.
Needles & Notions
Needle Size: US 17 (12mm) Circular Needles with a 40” (100cm) Cable
Gauge
8 STS & 12 rows per 4” (10cm) square, knit in moss stitch

Photo Details
Model Details:
–Height: 5’9″ (175cm)
–Weight: 130lbs (59kg)
–Bust: 35″ (88cm)
–Waist: 25″ (63cm)
# of CO stitches: 65
Measurements, after blocking: 16″ x 33″ wide (41cm x 84cm)
Weight: 1lb 5.2oz (600g)
Sizes
| Size | W” | x | L” | # of CO STS (width) | Skeins Needed | Meters Needed | Yards Needed |
| XS | 29 | x | 12 | 57 | 3 | 216 | 236 |
| S | 31 | x | 14 | 61 | 4 | 270 | 295 |
| M | 33 | x | 16 | 65 | 4 | 328 | 359 |
| L | 35 | x | 18 | 69 | 5 | 391 | 428 |
| XL | 37 | x | 20 | 73 | 6 | 460 | 503 |
| 2XL | 39 | x | 22 | 77 | 7 | 533 | 583 |
| 3XL | 41 | x | 24 | 81 | 8 | 611 | 668 |
Notes
Not reversible.
Knit top down.
Knit using the moss stitch.
Knit flat, back & forth on circular needles, which are used to accommodate the large number of CO stitches, do not join in the round.
Knitting Abbreviations
*– * – repeat between the asterisks to end of row
BO – bind-off in pattern
CO – cast-on (long-tail cast-on method)
K – knit stitches (K1 means to knit 1 stitch)
P – purl stitches (P2 means to purl 2 stitches)
RS – right side
STS – stitches
WS – wrong side
Save it for Later
- Buy the ad-free, printer-friendly pattern in The Shop.
- Save it to your Ravelry Library!
- Pin-it to Pinterest for later.
Download & Print this Pattern
Do you enjoy working from a paper copy? Get the downloadable, printer-friendly PDF completely ad-free.
That way you can have lifetime access to it and download it to any device and view it from anywhere, without ads (and the pattern might not be around forever).

Detailed Pattern Instructions
 |
 |
 |
CO the desired number of STS from the Size Chart above.
Top, 1×1 Rib Stitch:
Rows 1, 3, 5 (WS): *P1, K1* last stitch: P1
Save this pattern for later!
Rows 2, 4 (RS): *K1, P1* last stitch: K1
Body, Moss Stitch:
Row 6 (RS): *P1, K1* last stitch: P1 (knit the purls and purl the knits)
Row 7 (WS): *K1, P1* last stitch: K1 (knit the knits and purl the purls)
Row 8 (RS): *K1, P1* last stitch: K1 (knit the purls and purl the knits)
Row 9 (WS): *P1, K1* last stitch: P1 (knit the knits and purl the purls)
Repeat rows 6-9 according to the “Size” chart above, or until desired length, minus the bottom ribbing.
Bottom, 1×1 Rib Stitch:
Row 1, 3 (RS): *P1, K1* last stitch: P1
Row 2, 4 (WS): *K1, P1* last stitch: K1
Row 5 (RS): BO in the P1, K1 pattern
Knit the 2nd side the same as the first.
The front and back are the same.

*Sew seams along the red lines.
Top Seams:
Put the wrong sides together.
Starting from the outside, seam the top seam, leaving a hole large enough to fit your head through and maybe show a little shoulder. My head hole width measures 12″/30cm. Make sure the seams from the outside to the inside are the same measurement on each side.
Side Seams:
Starting from the bottom, seam each side using the mattress stitch, leaving a hole just large enough to fit your hand and arm through. My arm hole measures 7″/18cm.
Weave in the ends.
Steam-block lightly, which will add 1-2″/3-5cm of length and soften the stitches for a relaxed drape.
Simple Pattern Instructions
CO the desired number of STS from the Size Chart above.
Top, 1×1 Rib Stitch:
Rows 1, 3, 5 (WS): *P1, K1* P1
Rows 2, 4 (RS): *K1, P1* K1
Body, Moss Stitch:
Row 6 (RS): *P1, K1* P1
Row 7 (WS): *K1, P1* K1
Row 8 (RS): *K1, P1* K1
Row 9 (WS): *P1, K1* P1
Repeat rows 6-9 according to the Size Chart above, minus the bottom ribbing, or until desired length.
Bottom, 1×1 Rib Stitch:
Row 1, 3 (RS): *P1, K1* P1
Row 2, 4 (WS): *K1, P1* K1
Row 5 (RS): BO in the P1, K1 pattern
Knit the 2nd side the same as the first. The front and back are the same.
Top Seams:
Put the wrong sides together.
Starting from the outside, seam the top seam, leaving a hole large enough to fit your head through and maybe show a little shoulder. My head hole width measures 12″/30cm. Make sure the seams from the outside to the inside are the same measurement on each side.
Side Seams:
Starting from the bottom, seam each side using the mattress stitch, leaving a hole just large enough to fit your hand and arm through. My arm hole measures 7″/18cm.
Weave in the ends.
Steam-block lightly, which will add 1-2″/3-5cm of length and soften the stitches for a relaxed drape.
|
|
|
|