How to Knit a Seed Stitch Triangle Shawl
This post may contain affiliate links. Please read my disclosure policy.
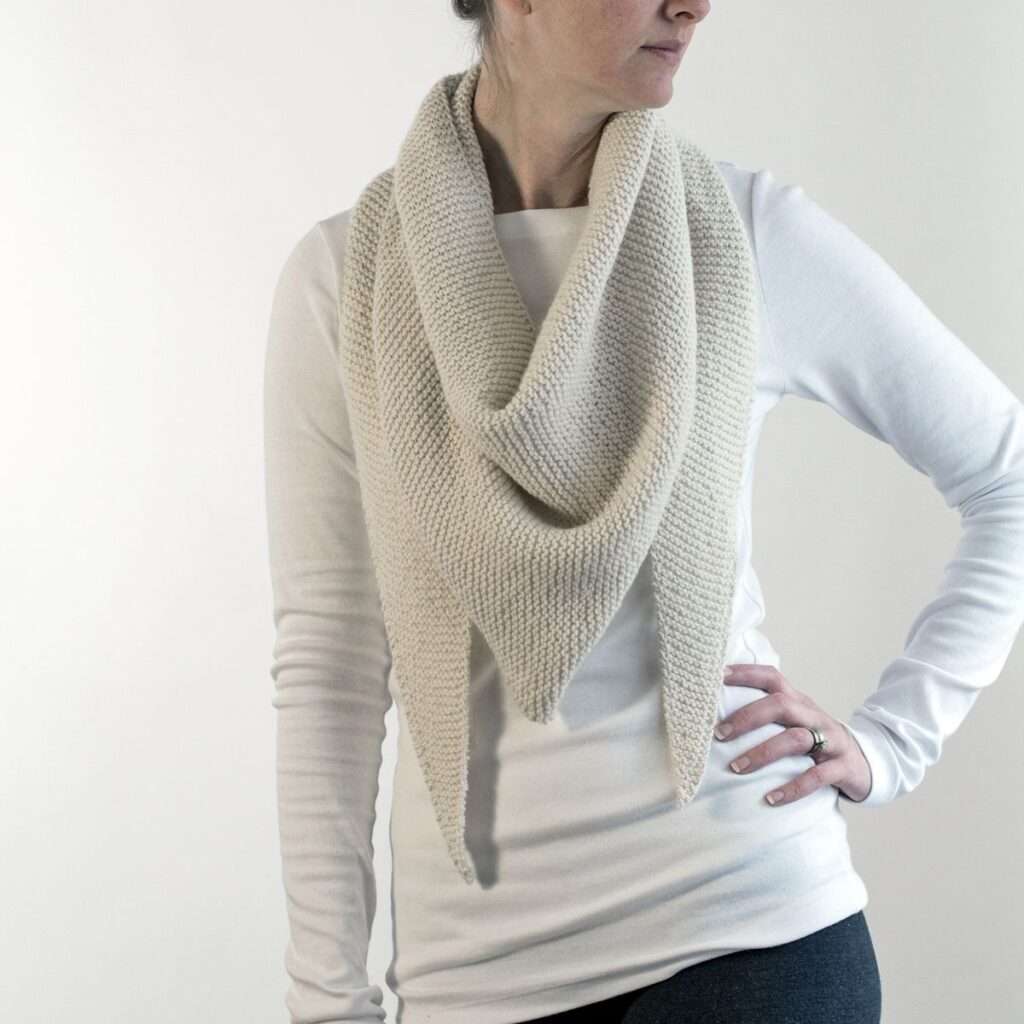
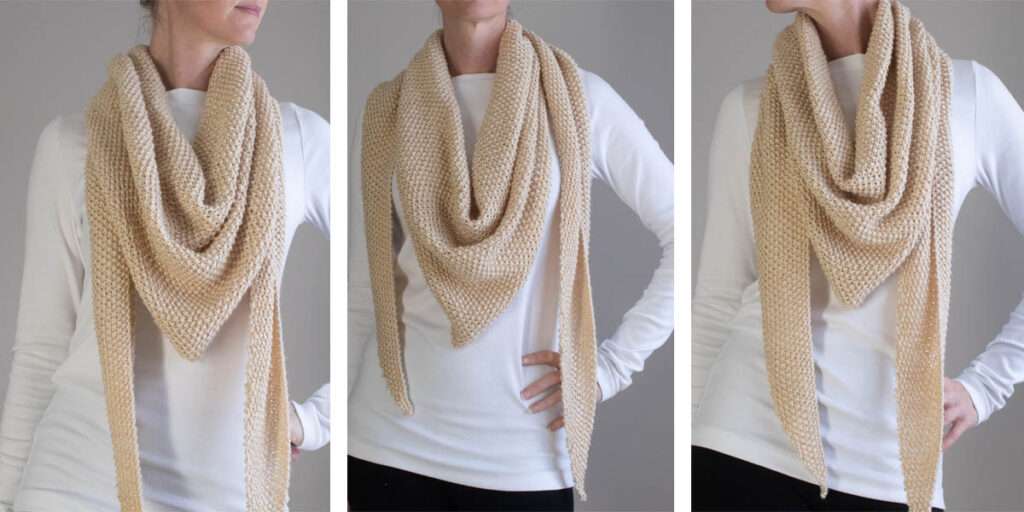
Learn how to knit this simple seed stitch triangle shawl in the photo & video tutorials below to help you along the way. ;) It’s knit from tip to tip with simple increases and decreases.

Save this for later!
No spam, ever. Unsubscribe at any time.
Knitted triangle shawls are classic & cozy winter accessories that are always in style.
Fall in Love With This Seed Stitch Triangle Shawl!
- Perfect squish & texture
- Lovely drape
- A cozy winter accessory
- Easy to memorize pattern
- Versatile & giftable
This triangle shawl pattern was inspired by my Grab N Go Triangle Shawl, which just so happens to be one of my most popular shawl patterns!
About the Pattern
This triangle shawl is a little different than a basic shawl because it’s shorter and longer than a traditional shawl pattern.
It’s knitted from tip to tip. Starting at one end you simply increase the stitches until it’s the perfect height and then switch to decreasing the stitches until you only have 1 left.
Yes, it really is that easy. ;)
- Available Sizes: One
- Pattern Format: Written Pattern, No Chart
- Pattern Language: English
- Skill Level: Advanced Beginner
- There’s a bonus video below
Techniques
Here are some of the knitting skills that’s helpful to know before getting started:
- Knit Flat (Back & Forth)
- Knit & Purl Stitches
- Increase Stitch
- Decrease Stitch
Yarn & Substitutions
- Yarn Weight: Worsted
- Yardage: 475 – 500 yards (434 – 457 meters)
- Suggested Yarn: Lion Brand Heartland, 100% acrylic
Lion Brand Fisherman is a lovely 100% wool yarn substitution. This is one of those yarns I keep in my stash because it’s so versatile.
Wool and the Gang Feeling Good Yarn would be so fuzzy, squishy, warm & cozy! (Now I want one in this yarn too!)
If you’re looking for a different substitute, I recommend checking out YarnSub.com for other yarn options. They’re an excellent resource!
Needles & Notions
- US 9 (5.5mm) Straight Knitting Needles
- Darning Needle
- Removable Stitch Markers (optional)
Details
- Measurements: 94″ length x 16″ (239cm x 40cm)
- Gauge: 15.5 STS & 22 rows per 4” (10cm) square, knit in the seed stitch pattern below
- Weight: 10.1oz (285g)
Notes
- Reversible.
- Knit from tip to tip.
- Knit using the seed knit stitch.
- The height is the number of stitches you have on your needles.
- The length is the number of rows you have knitted.
Video Tutorial
Learn how to cast-on, increase, decrease and tips to read your work & not the pattern.
Knitting Abbreviations
- *– * – repeat between * to end of row
- BO – bind-off in pattern
- CO – cast-on (long-tail cast-on method)
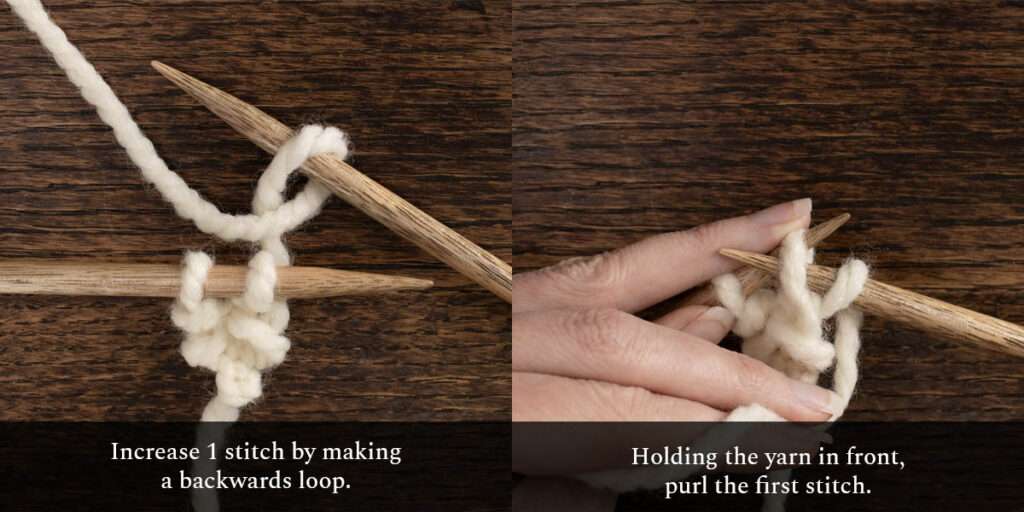
- INC1 – make 1 stitch (I used a backwards loop)
- K – knit stitches (K1 means to knit 1 stitch)
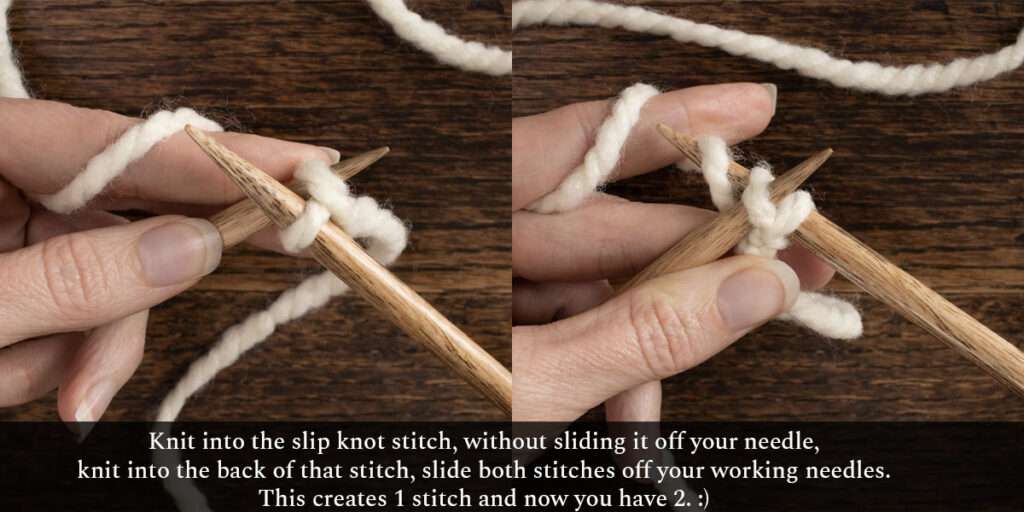
- KFB – knit the stitch, before slipping off, knit another stitch into the back of the same stitch, slip to right needle
- P – purl stitches (P2 means to purl 2 stitches)
- SKP – slip 1 stitch purl-wise, knit the next stitch, pass the slipped stitch over the knitted stitch
- STS – stitches
What exactly makes this easy to memorize?!
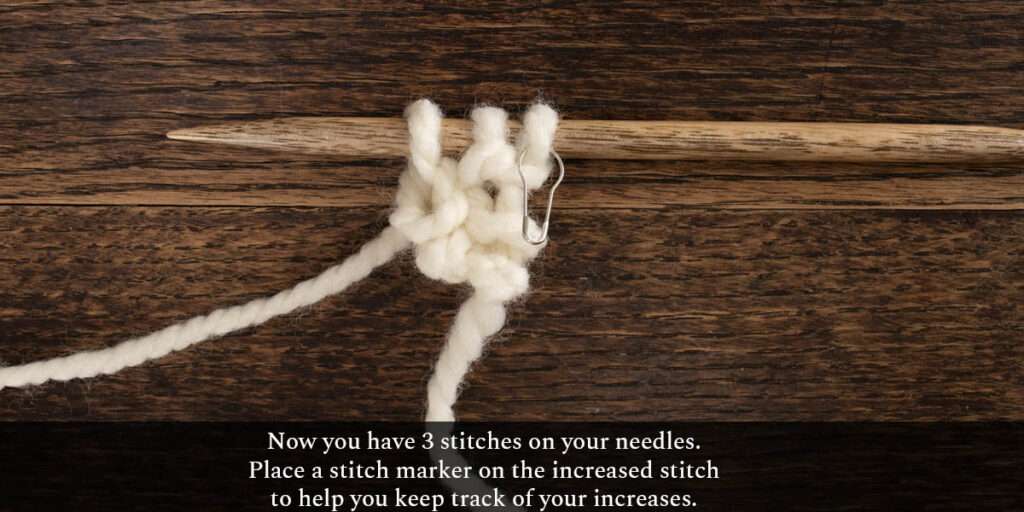
I’m glad you asked! Once you get through the first 9 rows (video provided), essentially, you’re just knitting into the purl stitches and purling into the knitted stitches and increasing the first stitch on every 4th row, which is easy to determine when you mark it with a removable stitch marker or scrap piece of contrasting yarn. ;)
Save it for Later
- Buy the ad-free, printer-friendly pattern in the Brome Fields shop.
- Save it to your Ravelry library!
- Pin-it for later here.
Download & Print this Pattern
Do you enjoy working from a paper copy? Get the downloadable, printer-friendly PDF completely ad-free.
That way you can have lifetime access to it and download it to any device and view it from anywhere, without ads (and the pattern might not be around forever).
Seed Stitch Triangle Shawl Pattern
This shawl is knit flat, back & forth, row-by-row.
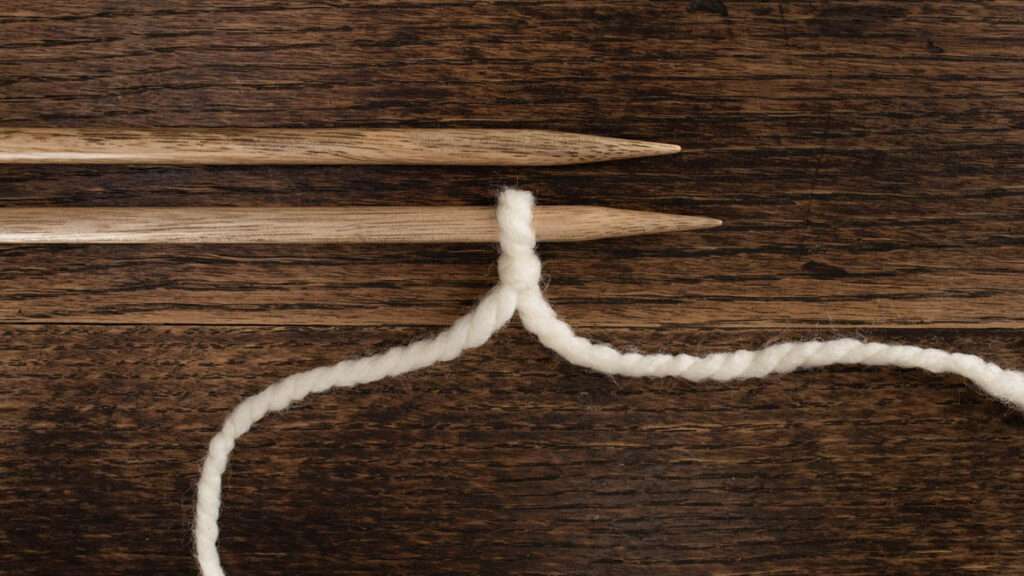
Step 1: CO 1 stitch, using a slip knot.
Step 2: Increase 1 stitch.
Row 1: KFB. Knit into the front & back of your one stitch, creating 1 stitch, so you now have 2 stitches on your working needle
Step 3: Work the next 3 rows in the following pattern:
Row 2: K1, P1
Row 3: P1, K1
Row 4: K1, P1
Step 4: Increase 1 stitch.
Row 5: INC1, P1, K1
Step 5: Work the next 3 rows in the following pattern:
Row 6: K1, P1, K1
Row 7: K1, P1, K1
Row 8: K1, P1, K1
Step 6: Increase 1 stitch.
Row 9: INC1, K1, P1, K1
Step 7: Start of the Increase Row Repeat:
Note: For rows 10-13 you’ll have an EVEN # of STS on your needles.
Work the next 3 rows in the following pattern:
Row 10: *K1, P1*
Row 11: *P1, K1*
Row 12: *K1, P1*
Increase 1 stitch in the next row:
Row 13: INC1 *P1, K1*
Note: For rows 14-16 you’ll have an ODD # of STS on your needles.
Work the next 3 rows in the following pattern:
Row 14: *K1, P1* K1
Row 15: *K1, P1* K1
Row 16: *K1, P1* K1
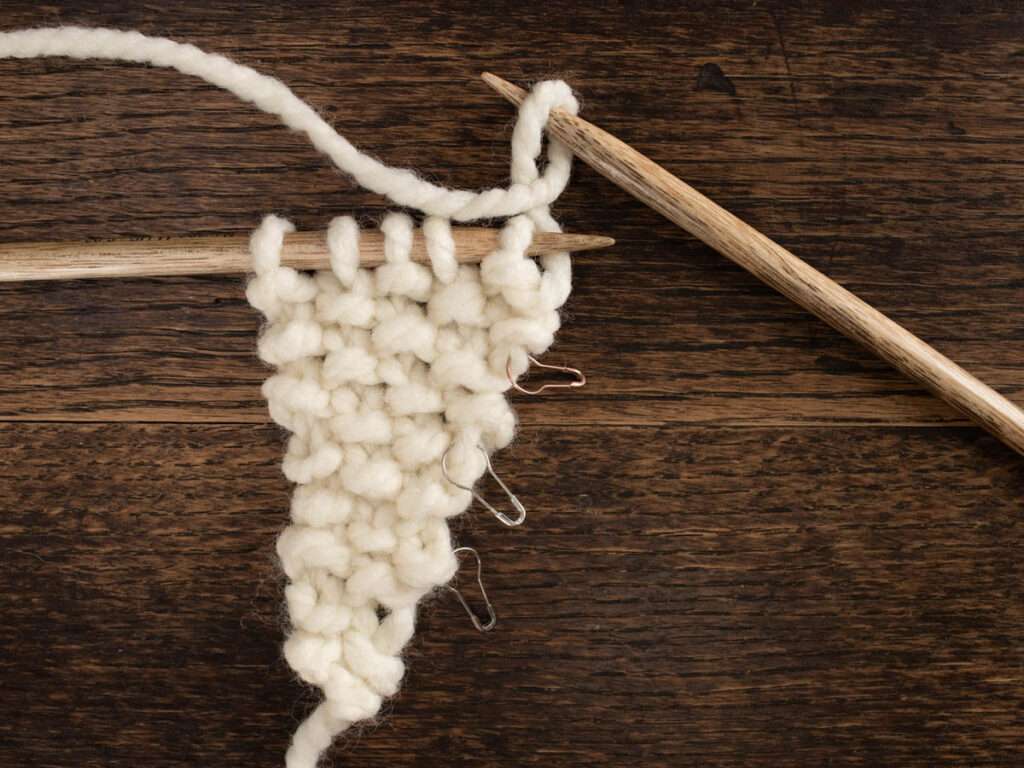
Increase 1 stitch in the next row:
Row 17: INC1 *K1, P1* K1
Repeat Increase Rows 10-17 until you have 65 STS, or until desired height.
Step 8: Start of the Decrease Row Repeat:
Now you’re ready to start decreasing! The first half of the shawl is exciting because you’re watching it grow and the second half of the shawl is exciting because it goes faster with every decreased stitch and you know you’re that much closer to being finished.
Note: For rows 1-3 you’ll have an EVEN # of STS on your needles.
Work the next 3 rows in the following pattern:
Row 1 : *K1, P1*
Row 2 : *P1, K1*
Row 3 : *K1, P1*
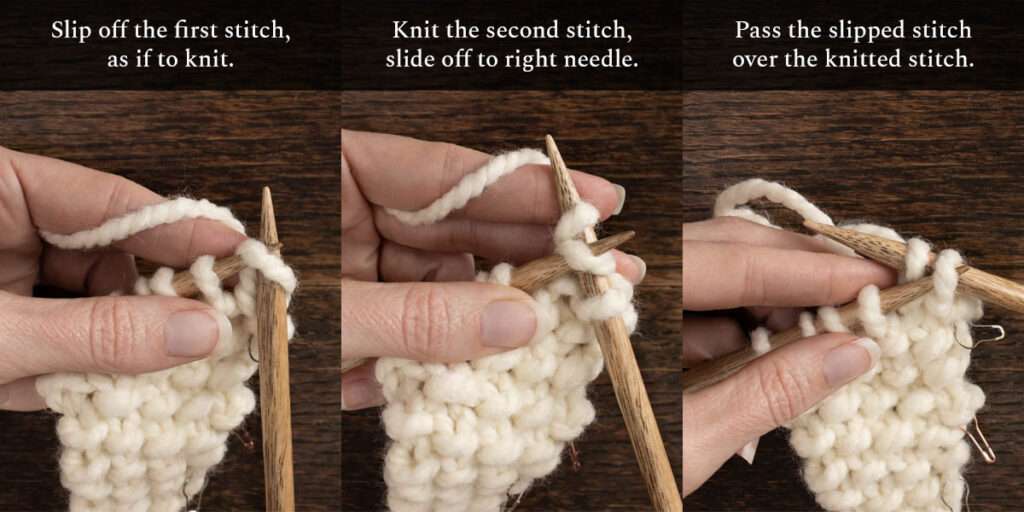
Decrease 1 stitch in the next row:
Row 4 : SKP *P1, K1*
Slip one stitch off the work needle and onto the left needle, as if to knit.
Knit the second stitch, slipping it to the left needle.
Pass the slipped stitch over the knitted stitch, decreasing 1 stitch.
Note: For rows 5-7 you’ll have an ODD # of STS on your needles.
Work the next 3 rows in the following pattern:
Row 5: *K1, P1* K1
Row 6: *K1, P1* K1
Row 7: *K1, P1* K1
Decrease 1 stitch in the next row:
Row 8: SKP *K1, P1* K1
Slip one stitch off the work needle and onto the left needle, as if to knit.
Knit the second stitch, slipping it to the left needle.
Pass the slipped stitch over the knitted stitch, decreasing 1 stitch.
Repeat rows 1-8 until you have 4 STS remaining.
Step 9: Finish the tip of your shawl.
Work the next 3 rows in the following pattern:
Row 1 : *K1, P1*
Row 2 : *P1, K1*
Row 3 : *K1, P1*
Note: Decrease 1 stitch in each of the following rows until you have 1 stitch remaining.
Row 4: K1, SKP, K1 {3 STS remaining}
Knit the first stitch, slip 1 stitch, knit the next stitch and then pass the slipped stitch over the knitted stitch, knit the last stitch.
Row 5: K1, SKP {2 STS remaining}
Knit the first stitch, slip 1 stitch, knit the next stitch and then pass the slipped stitch over the knitted stitch.
Row 6: SKP {1 STS remaining}
Slip the first stitch, knit the next stitch and then pass the slipped stitch over the knitted stitch.
You have 1 stitch remaining. Cut your tail, about 6″ or so, pull the yarn through your last stitch and then weave in the ends.
Steam-block lightly (optional)
Happy Knitting!
I hope you enjoyed learning how to knit this simple seed stitch triangle shawl in the photo & video tutorials above! And they were helpful along the way. ;)
I love this unique style of shawl that’s knit from tip to tip with simple increases and decreases. It becomes quite relaxing to knit once you get the hang of it.
This shawl can be worn as a scarf too. With the long tails, this quickly became one of my favorite triangle shawl patterns!
If you like this Seed Stitch Triangle Shawl Knitting Pattern,
here are some more shawl patterns you’ll love:


