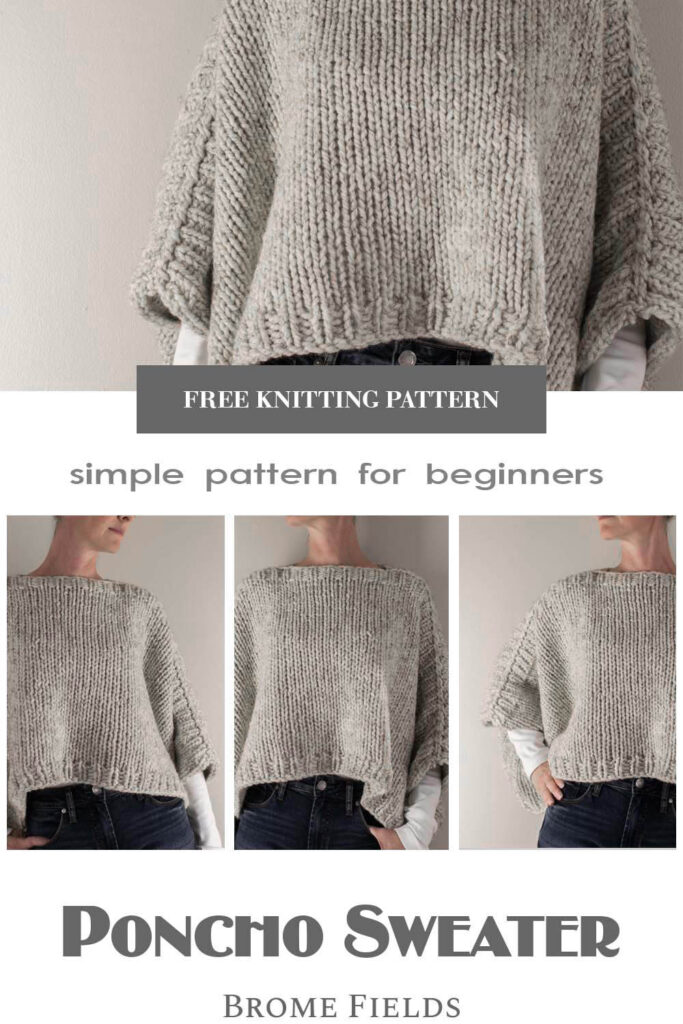
How to Knit a Chunky Poncho Sweater
This post may contain affiliate links. Please read my disclosure policy.
The Coziest Thing You’ll Knit All Season (And It’s Just 2 Rectangles!)
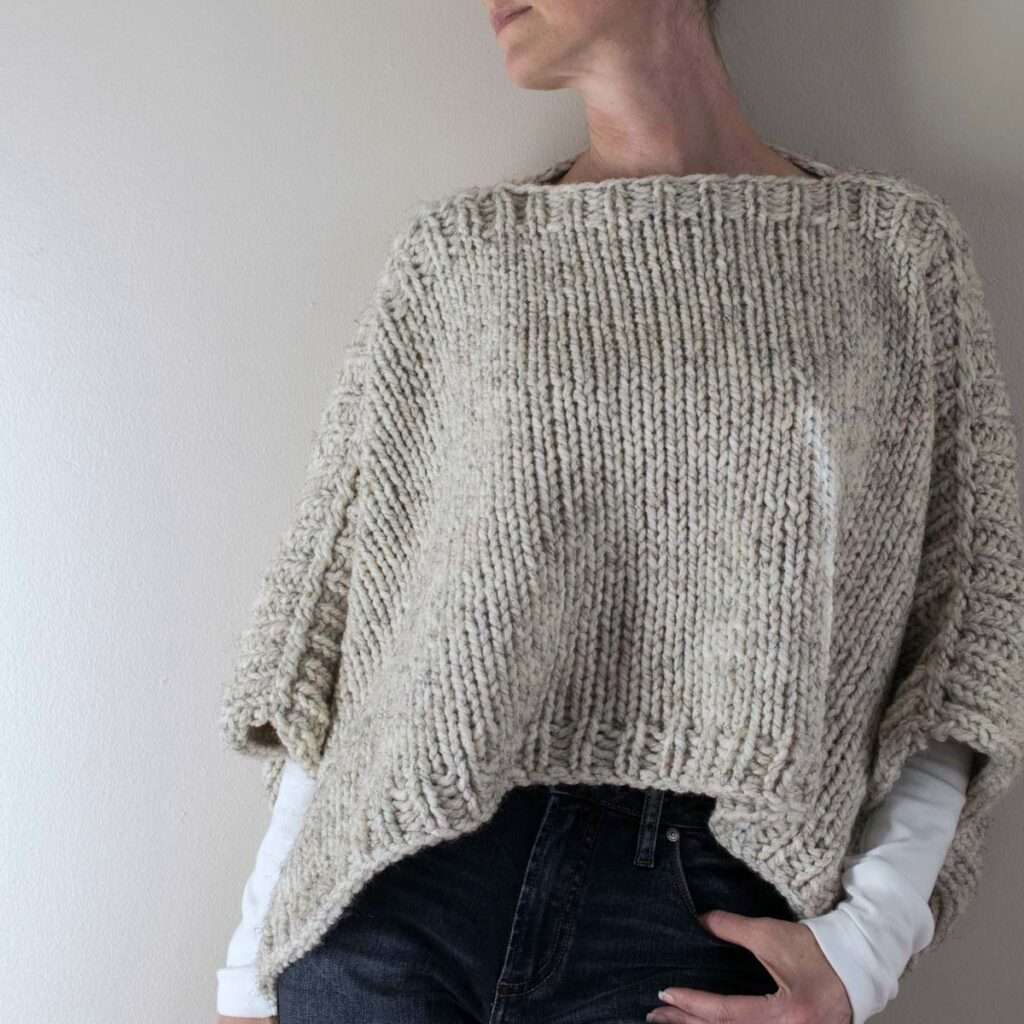
If you’re craving a project that’s big on comfort and low on complexity, you’re in the right place. This chunky poncho sweater might look like something you’d find in a boutique, but don’t be fooled — it’s made from just two rectangles and a few simple seams.
Whether you’re curled up with a cup of tea or heading out for a crisp autumn walk, this cozy knit layers effortlessly and makes a stylish statement. It’s the kind of knit you’ll reach for again and again — because it’s not just warm, it’s wearable.
Looking for something specific? Use this Table of Contents to jump straight to the section you need!
About the Chunky Poncho Sweater Pattern
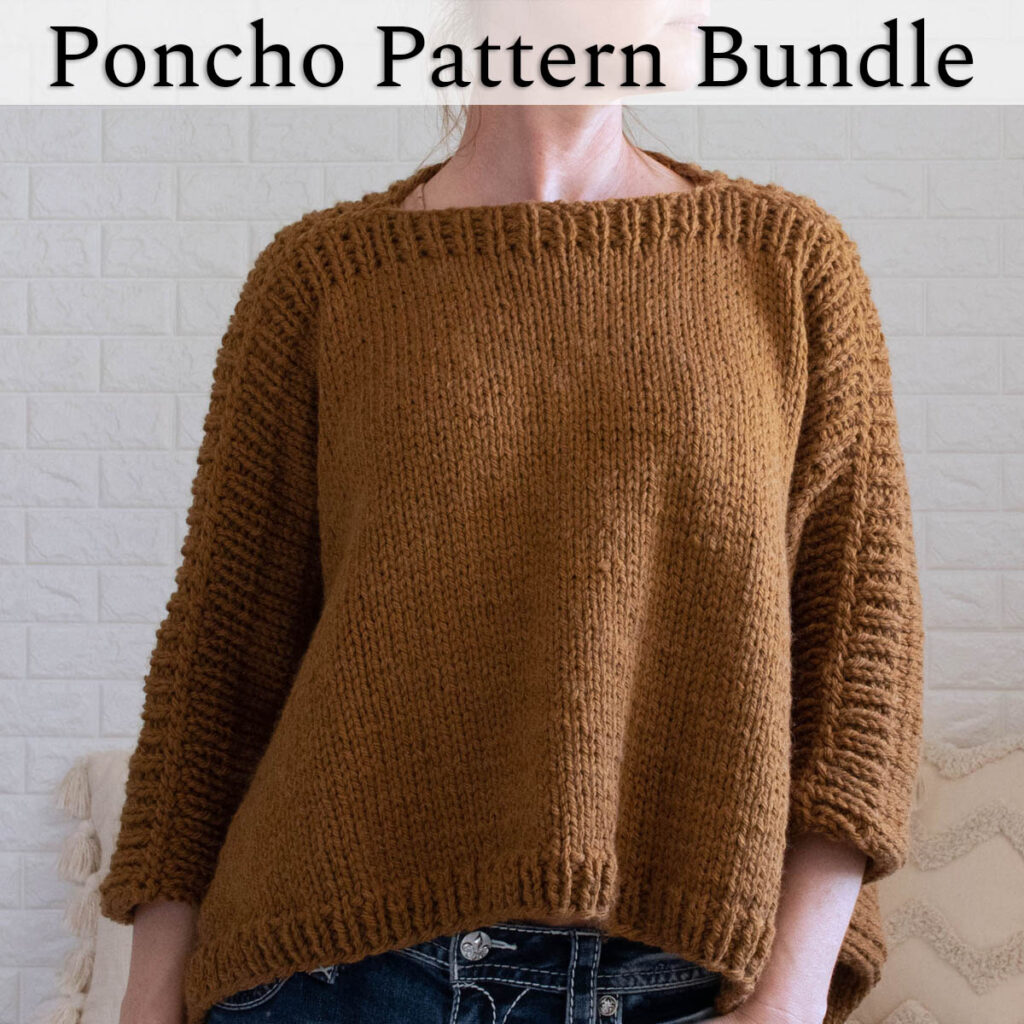
My On the Go Poncho Pattern in bulky weight yarn is so popular and I’ve had several requests to make it in super bulky yarn, so here it is!
Ponchos are so easy! Just knit 2 rectangles, sew the 2 top seams and 2 side seams and now you have a poncho.
Start at the top working in a rib stitch (knit 1, purl 1) to create a boat neck ribbed collar and then switch to stockinette for the body section and do a few more rows of the rib stitch, bind-off and do it all over again for the second side. Bonus – the second side is quicker than the first, plus, you’re halfway finished!
- Available Sizes: Eight (XXS – 3XL)
- Pattern Format: Written Pattern, No Chart
- Pattern Language: English
- Skill Level: Beginner & Advanced Beginner
- PDF Format: Printer-Friendly
- Bonus: Videos
Plus, there’s an advanced version for brave beginner knitter’s who’d like to have a pretty edge.
What You’ll Need to Know
Before you cast-on, here are a few simple tips to help your project flow smoothly.
If you can knit and purl, you’ve got everything you need to make this chunky poncho sweater!
OR if you want to master knit & purl stitches then this is the perfect project to get comfortable with the basics — just knit and purl your way to a cozy knit poncho!
- Knit Flat
- Knit & Purl Stitches
- Clean Edge (advanced version only)
- No shaping, meaning no increase or decrease stitches
Gauge:
4” (10 cm) square knit flat in stockinette stitch.
Before steaming: 9 STS & 13 rows
After steaming: 8 STS & 14 rows
Notes:
Not reversible.
Knit top down or bottom up, either way.
Knit using the rib stitch & stockinette stitch.
Knit flat, back & forth using circular needles.
Circular needles are used to accommodate the large number of CO stitches.
If you’re adjusting the width, be sure to cast-on an odd number of stitches. And be sure to write that number down, so you can knit the second side the same as the first. 😉
WHAT’S TO LOVE!?
- Quick & easy poncho knitting pattern
- Video tutorials to help you along the way
- Classic pattern that never goes out of style
- Simple construction
- Cozy drape
- Oversized knit poncho
- A layer of extra warmth… like a hug
- Poncho knitting pattern with super bulky yarn for a quick knit
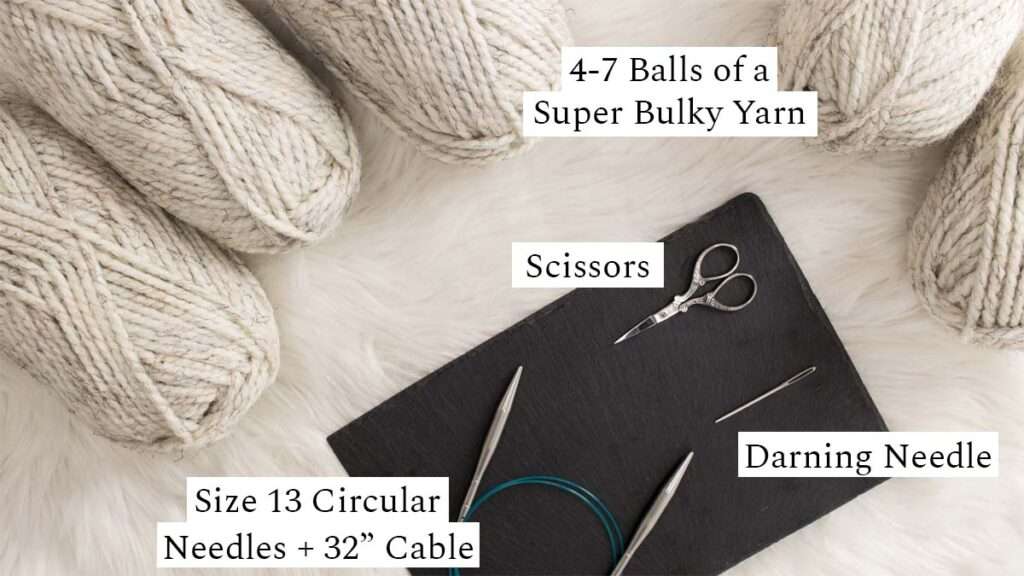
Materials You’ll Need
To knit your Chunky Poncho Sweater, you’ll need super bulky yarn to create a warm, squishy fabric that’s perfect for cold-weather layering. You’ll also want a pair of long circular knitting needles to hold all your stitches with ease, a tapestry needle for seaming & finishing those loose ends and a garment steamer to smooth out your stitches and give your poncho a polished look.
Yarn, Needles & Tools:
Yarn Weight: Super Bulky Yarn
Yardage: 388 – 720 yards (355 – 658 meters)
Suggested Yarn: Lion Brand Wool Ease Thick & Quick in the color Wheat
US Size 13 (9mm) Circular Knitting Needles with a 32” (80cm) Cable
Garment Steamer
Darning Needle or Tapestry Needle
Scissors
Lion Brand Wool Ease Thick & Quick is affordable, squishy & durable. Plus, using super bulky yarn makes for a quick knitting project, which is great for short attention spans! ;)
It’s a wool & acrylic fiber blend, which I think is what makes it warmer and more durable than other options. PLUS, it’s washer & dryer friendly!
Alternative Yarn Substitutes:
- Lion Brand Hometown Yarn
- Cascade Yarns Pacific Chunky
- Hobbii Umami
- Rico Designs Creative Twist
- Rowan Big Wool (100% wool)
- Yarn Bee Dream Supreme
- Paint Box Yarns Wool Blend Super Chunky
Check out Yarnsub’s for more yarn substitutions.
If you’re looking for other substitutes, I recommend checking out YarnSub.com for other yarn options. They’re an excellent resource!
Rectangle Poncho Size Chart
Choosing the size is the hardest part of this pattern! Once you knit a couple of ponchos choosing your size will be so much easier.
Fun Fact:
According to Scientific America “A person’s arm span is about equal to their height.” Taking that fun fact into consideration, you may want to knit more or fewer rows than recommended in the chart, depending on your height.
You might notice that I used the arm span measurement instead of the usual bust measurement when sizing this poncho — and here’s why. While bust size works well for fitted garments, ponchos are all about how they drape across your shoulders and down your arms. Someone who’s 5’5″ with a 38″ bust will wear a poncho very differently than someone who’s 5’10” with the same bust size. In this case, the arm span tells us more about where the fabric will fall and how the poncho will fit overall. It might be a little unconventional, but for this style, it just makes more sense!
How it fits the model:
Model is 5’9″/175cm, 130lbs with a 35″/88cm bust, 25″/63cm waist wearing a 45″ width poncho with high-rise jeans. Once complete, the poncho reaches slightly beyond each elbow for a cozy, oversized fit.
| Size | Height | W” | x | L” | # of CO STS | Yards | Meters | # of Skeins |
| XXS | 5’5″ | 41 | x | 12 | 81 | 388 | 355 | 4 |
| XS | 5’6″ | 42 | x | 13 | 83 | 431 | 394 | 4 |
| S | 5’7″ | 43 | x | 14 | 85 | 475 | 435 | 4 |
| M | 5’8″ | 44 | x | 15 | 87 | 521 | 476 | 5 |
| L | 5’9″ | 45 | x | 16 | 89 | 568 | 520 | 5 |
| XL | 5’10” | 46 | x | 17 | 91 | 617 | 565 | 6 |
| 2XL | 5’11” | 47 | x | 18 | 93 | 668 | 611 | 6 |
| 3XL | 6’0″ | 48 | x | 19 | 95 | 720 | 658 | 7 |
For a mobile friendly view, turn your phone horizontally 👌
* The poncho was designed to be just long enough to meet high waisted jeans.
Knit more rows in the body section to make it longer.
Knit fewer rows in the body section to make it shorter.
** The poncho on the model reaches slightly beyond each elbow. For a larger bust or waist you may want to make it a little wider, depending on your size & style. 🙂
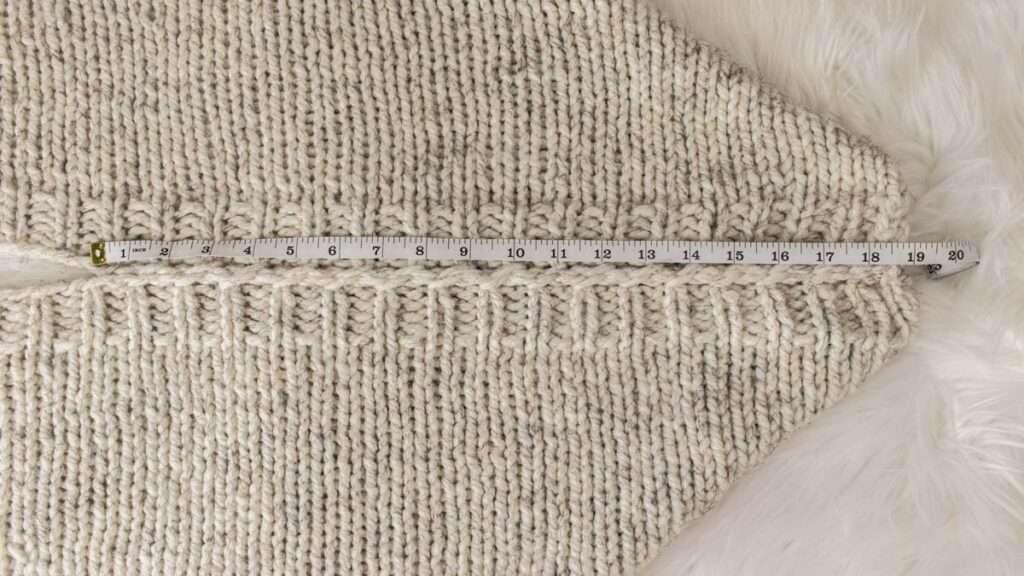
Measurements, after steaming:
- 45″ wide x 16 1/2″ (114cm x 48cm)
- Weight: 1lb 13.5oz (835g)
How to Seam the Seams (Video Tutorials)
Top Seam:
Side Seam:
Knitting Abbreviations
*– * – repeat between asterisks
BO – bind-off in pattern
CO – cast-on (long-tail cast-on method)
K – knit stitches (K1 means to knit 1 stitch)
K1TBL – knit 1 stitch through the back loop
P – purl stitches (P2 means to purl 2 stitches)
RS – right side
S1PW – slip one stitch purl-wise
STS – stitches
WS – wrong side
WYIF – with yarn in front
Save This for Later
- Buy the ad-free, printer-friendly pattern on in the shop.
- Save it to your Ravelry Library!
- Pin-it for later here.
Download & Print this Chunky Poncho Pattern
Do you enjoy working from a paper copy? Get the downloadable, printer-friendly PDF completely ad-free.
That way you can have lifetime access to it and download it to any device and view it from anywhere, without ads (and the pattern might not be around forever).
Save this pattern for later!
How to Knit Your Chunky Poncho – BEGINNER Instructions
Knit flat, back & forth, row-by-row
Using the long-tail cast-on method, CO the number of STS from the Size section above.
Top Rib:
In this section, you’re creating a create a wide rib collar using the 1×1 ribbing for the top, where it sits on your shoulders. So, you’re going to knit into the knit stitches and purl into the purl stitches.
Rows 1, 3, 5 (WS): *P1, K1* last stitch: P1
Detailed Instructions:
Repeat in the purl 1, knit 1 pattern until you have 1 stitch remaining, purl the last stitch.
Rows 2, 4 (RS): *K1, P1* last stitch: K1
Detailed Instructions:
Repeat in the knit 1, purl 1 pattern until you have 1 stitch remaining, knit the last stitch. Knitting the knit stitches and purling the purl stitches in the previous row.
Body:
In this section, you’re going to knit in stockinette. Meaning, knit all of the stitches on the right side of your work and purl all the stitches on the wrong side of your work.
Row 6 (RS): *K*
Detailed Instructions:
Knit all the stitches in this row.
Row 7 (WS): *P*
Detailed Instructions:
Purl all the stitches in this row.
Repeat rows 6-7, until it measures 15″ (38cm) from the beginner or until desired length, minus the bottom ribbing.
Bottom Rib:
In this section, repeat the top ribbing, creating a 1×1 ribbing for the bottom. So, you’re going to knit into the knit stitch and purl into the purl stitches.
Repeat Row 6 (RS): *K*
Detailed Instructions:
Knit all the stitches in this row.
Rows 1, 3 (WS): *P1, K1* last stitch: P1
Detailed Instructions:
Repeat in the purl 1, knit 1 pattern until you have 1 stitch remaining and then purl the last stitch.
Rows 2, 4 (RS): *K1, P1* last stitch: K1
Detailed Instructions:
Repeat in the knit 1, purl 1 pattern until you have 1 stitch remaining and then knit the last stitch. Knitting the knit stitches and purling the purl stitches in the previous row.
Row 5 (WS): BO in the K1, P1 pattern
Detailed Instructions:
Knit the first stitch, purl the second stitch and then pass the knit stitch over the purl stitch.
*Knit the next stitch and then pass the purl stitch over the knit stitch. Purl the next stitch and then pass the knit stitch over the purl stitch* Repeat until you run out of stitches.
To end:
Cut the yarn, leaving a 12″ tail, which you can use to seam the side.
You’ve completed one long rectangle, knit the 2nd side the same as the first, the front and back are the same.
ADVANCED BEGINNER Pattern Instructions
Knit flat, back & forth, row-by-row
CO the number of STS from the Size section above.
Top Rib:
In this section, you’re creating a create a wide rib collar using the 1×1 ribbing for the top, where it sits on your shoulders. So, you’re going to knit into the knit stitches and purl into the purl stitches.
Rows 1, 3, 5 (WS): WYIF S1PW *P1, K1* last 2 sts: P1, WYIF S1PW
Detailed Instructions:
On the first stitch, bring the yarn into the front of your needle, slip 1 stitch purl-wise.
Next, repeat in the purl 1, knit 1 pattern until you have 2 stitches remaining on your working needles.
Purl the second to last stitch.
For the last stitch, with the yarn in front slip 1 purl-wise.
Rows 2, 4 (RS): K1TBL *K1, P1* last 2 sts: K1, K1TBL
Detailed Instructions:
Knit into the back loop of the first stitch.
Next, repeat in the knit 1, purl 1 pattern until you have 2 stitches remaining on your working needles.
Knit the second to last stitch.
Knit into the back loop of the last stitch.
Body:
In this section, you’re going to knit in stockinette. Meaning, knit all of the stitches on the right side of your work and purl all the stitches on the wrong side of your work.
Row 6 (RS): K1TBL *K* last stitch: K1TBL
Detailed Instructions:
Knit into the back loop of the first stitch.
Next, knit all the stitches until you have 1 stitch remaining on your working needles.
Knit into the back loop of the last stitch.
Row 7 (WS): WYIF S1PW *P* last stitch: WYIF S1PW
Detailed Instructions:
On the first stitch, bring the yarn into the front of your needle, slip 1 stitch purl-wise.
Next, purl all the stitches until you have 1 stitch remaining on your working needles.
On the last stitch, bring the yarn into the front of your needle, slip 1 stitch purl-wise.
Repeat rows 6-7, until it measures 15″ (38cm) from the beginner or until desired length, minus the bottom ribbing.
Bottom Rib:
In this section, repeat the top ribbing, creating a 1×1 ribbing for the bottom. So, you’re going to knit into the knit stitch and purl into the purl stitches.
Repeat Row 6 (RS): K1TBL *K* last stitch: K1TBL
Detailed Instructions:
Knit into the back loop of the first stitch.
Next, knit all the stitches until you have 1 stitch remaining on your working needles.
Knit into the back loop of the last stitch.
Rows 1, 3 (WS): WYIF S1PW *P1, K1* last 2 sts: P1, WYIF S1PW
Detailed Instructions:
On the first stitch, bring the yarn into the front of your needle, slip 1 stitch purl-wise.
Next, repeat in the purl 1, knit 1 pattern until you have 2 stitches remaining on your working needles.
Purl the second to last stitch.
For the last stitch, with the yarn in front slip 1 purl-wise.
Rows 2, 4 (RS): K1TBL *K1, P1* last 2 sts: K1, K1TBL
Detailed Instructions:
Knit into the back loop of the first stitch.
Next, repeat in the knit 1, purl 1 pattern until you have 2 stitches remaining on your working needles.
Knit the second to last stitch.
Knit into the back loop of the last stitch.
Row 5 (WS): BO in the K1, P1 pattern
Detailed Instructions:
Knit the first stitch, purl the second stitch and then pass the knit stitch over the purl stitch.
Repeat the next 2 sentences until you run out of stitches: Knit the next stitch and then pass the purl stitch over the knit stitch. Purl the next stitch and then pass the knit stitch over the purl stitch.
Cut the yarn, leaving a 12″ tail, which you can use to seam the side.
You’ve completed one long rectangle, knit the 2nd side the same as the first, the front and back are the same.
Bringing it all together (Both Versions)
Blocking:
Before seaming, steam-block both sides at once, so they stay approximately the same size.
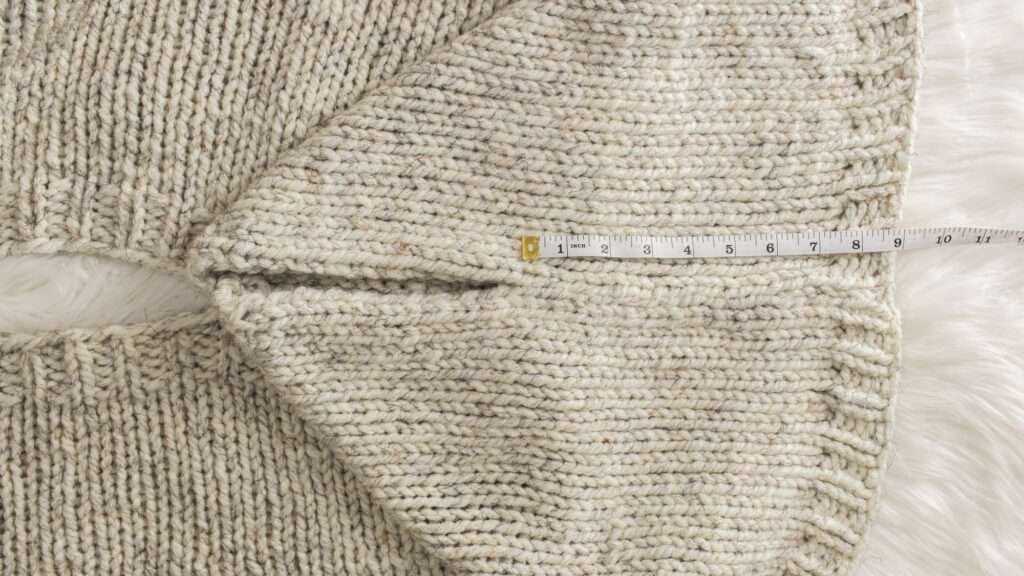
Top Seam:
Put the wrong sides together.
Starting from the outside, seam the top seam, leaving a hole just large enough to fit your head through. Make sure the seams from the outside to the inside are the same measurement. (watch the video to see how I sewed it.)
Mine measures 46″ wide and the hole width is 8″. Each top seam measures 19″.
Here’s the math: total width minus 8″ divided by 2 equals the length of each side.
Example: 46″ – 8″ = 38″ / 2 = 19″
Side Seam:
Starting from the bottom, seam each side using the mattress stitch, leaving a hole just large enough to fit your hand and arm through. (watch the video above to see how I sewed it.)
Weave in the ends.
How to Style Your Chunky Poncho Sweater
One of the best things about this poncho is how versatile it is. Whether you’re heading out into the cold or curling up at home, it’s the kind of piece that effortlessly elevates your outfit while keeping you warm and cozy. Here are some of our favorite ways to style your chunky knit poncho sweater:
Casual Everyday Look
Keep it simple and comfy by layering your poncho over a fitted long sleeve tee or lightweight turtleneck. Pair it with leggings or skinny jeans to balance the oversized silhouette. Slip on your favorite ankle boots or sneakers, toss your essentials in a tote bag and you’re good to go.
Cold-Weather Chic
Looking to dress things up a bit? Try layering your poncho over a fitted sweater and wide-leg trousers or structured pants. Add heeled boots for a little height and finish the look with statement earrings or a structured crossbody bag. It’s cozy, classy and totally winter-ready.
Cozy at Home
This poncho is perfect for lounging too. Throw it on with your comfiest joggers or thermal leggings with a soft tee or hoodie underneath. Add some chunky socks or slippers and settle in with your favorite book or knitting project. You’ll be warm, relaxed and stylish — even if no one sees you but the dog.
Layered for the Outdoors
For those chilly mornings or outdoor adventures, try layering your poncho over a flannel or thermal top. It pairs beautifully with jeans and rugged boots — think hiking boots or weatherproof sneakers. Add a beanie and fingerless gloves and you’re ready for the farmer’s market or a long scenic walk.
Elevated Comfort
Want to cozy up without sacrificing style? Drape your poncho over a midi skirt or sweater dress with warm tights and Chelsea boots. Add a belt bag over the top to give your silhouette a little structure. It’s effortless, elegant and still as comfy as your favorite blanket.
No matter how you wear it, your chunky poncho sweater is sure to become a go-to layering piece in your handmade wardrobe. From cozy nights in to crisp days out, it’s the kind of knit that adds comfort and character to any outfit. So don’t be afraid to experiment with different textures, layers and accessories — your poncho is as versatile as your creativity. ✨
More poncho patterns that you’ll love: