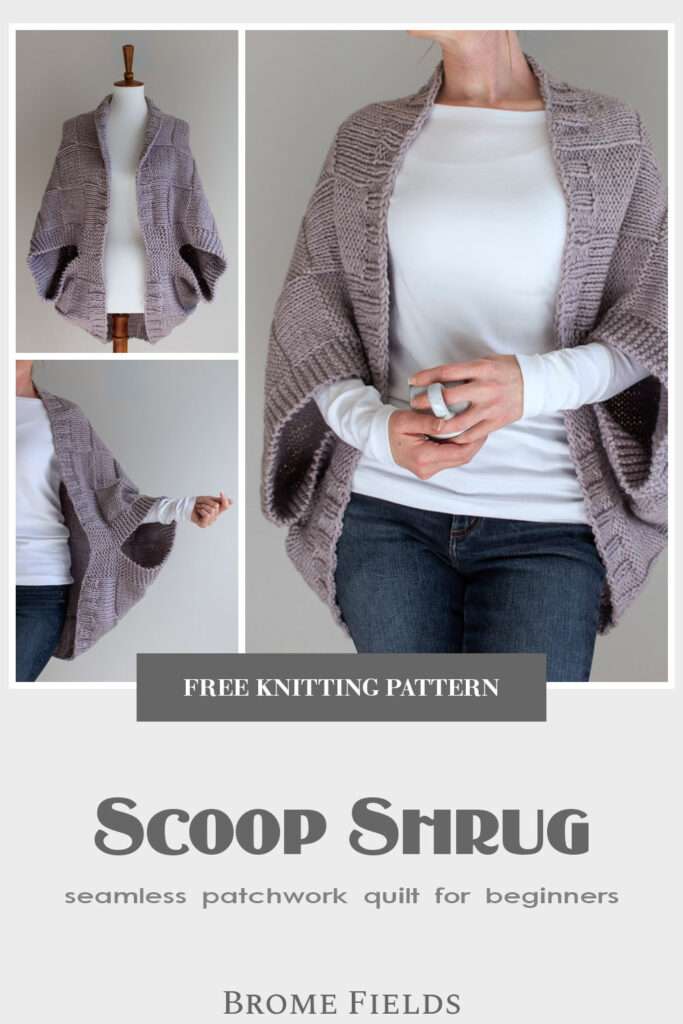
Patchwork Quilt Blanket Sweater Pattern
This post may contain affiliate links. Please read my disclosure policy.
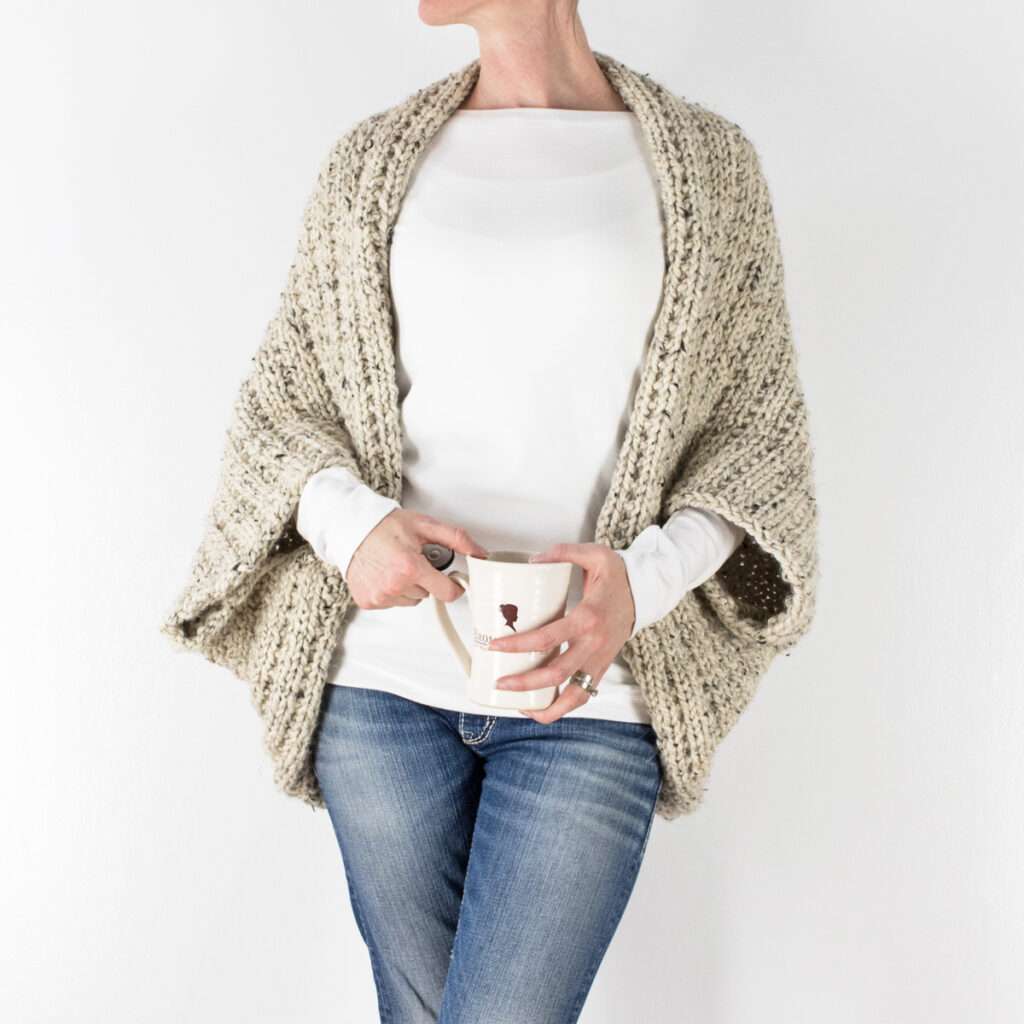
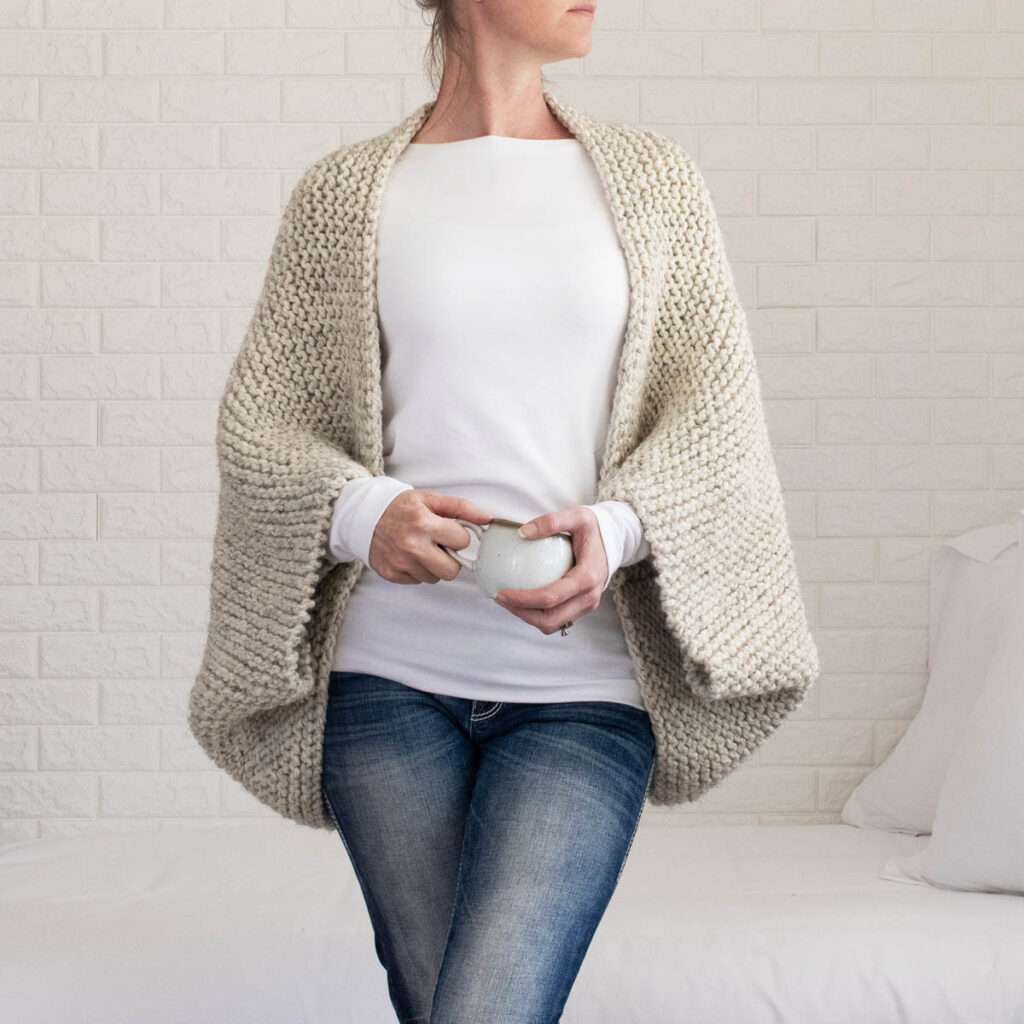
Learn how to knit this seamless Patchwork Quilt Blanket Sweater for beginners pattern. If you love knitting blankets, then you’re gonna love this Blanket Sweater Shrug pattern!
About the Pattern
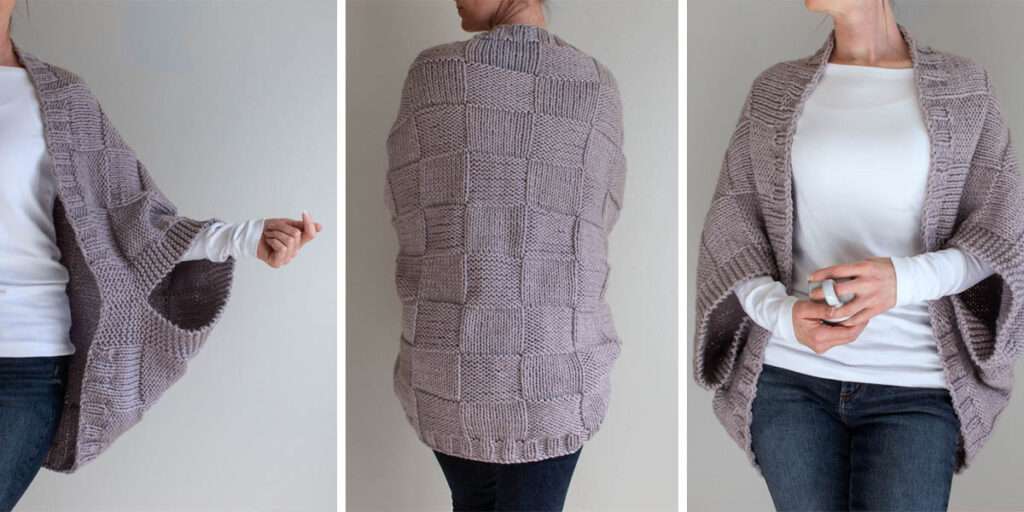
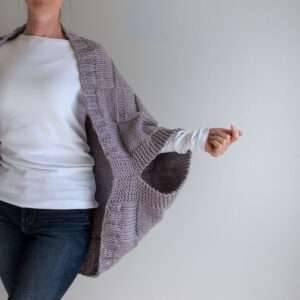
Blanket sweaters are so easy! No one will guess that it’s just a rectangle. All you do is knit one rectangle and then sew the sides to create the armholes. And it’s easy enough for a beginner knitter too. ;)
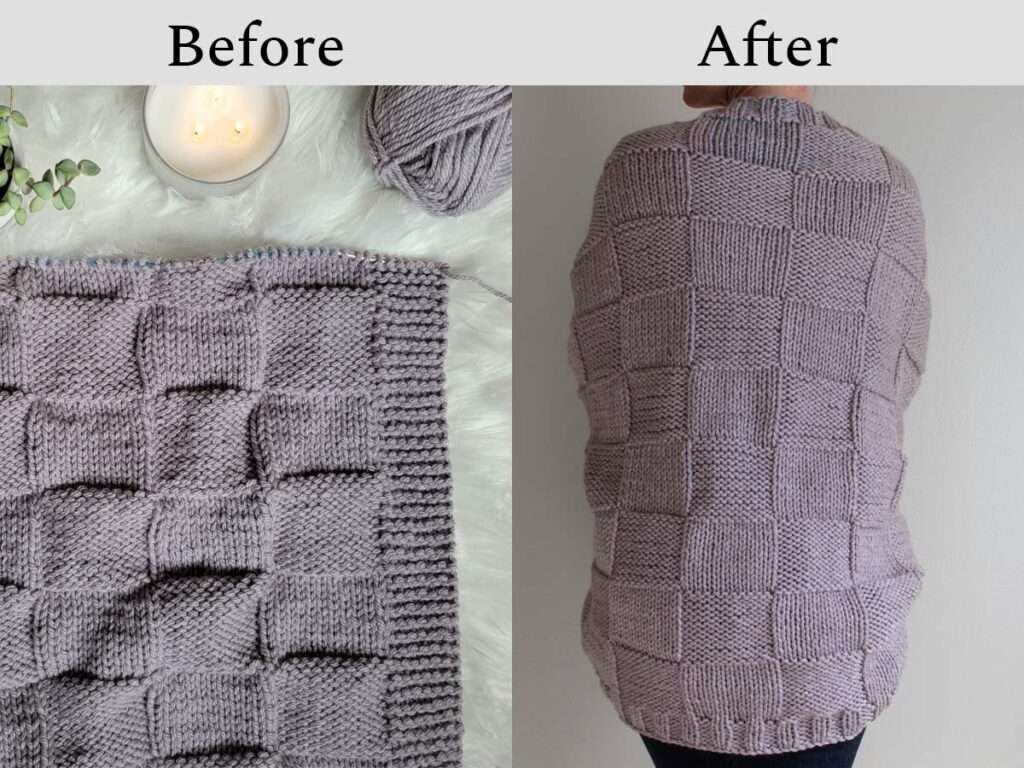
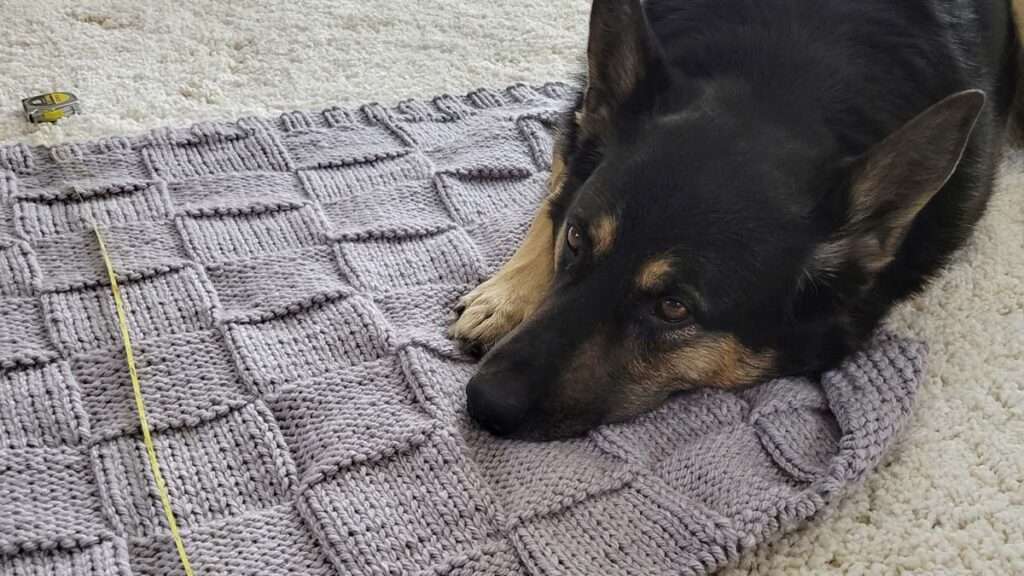
This quilted blanket has the look of knitted blanket squares, but it’s knit seamlessly as one quilted patchwork blanket and then I turned it into a shrug.
I love knitting shrugs! I love the thought of knitting a blanket, but they’re so big and take so long. Making the shrug a perfect knitting project. I get to knit a small blanket and wear it like a jacket!
This patchwork blanket sweater makes for a cozy shrug that should be in everyone’s wardrobe!
Available Sizes: Three
Pattern Format: Written Pattern, No Chart
Pattern Language: English
Skill Level: Beginner
PDF Format: Printer Friendly
Knitting Techniques
You’ll be using basic stitches, knits and purls only, to create the look of knitted squares for this seamless patchwork knitted quilt blanket sweater. So, you get the look of knitted squares, but without all the seaming!
It’s knit flat, back and forth, using circular cable needles to hold the large number of required stitches. Keep in mind that you won’t be joining it in the round. You’ll knit the stitches as if you’re using straight knitting needles.
Learn how to knit a patchwork quilt without knitting squares, seamlessly.
Here are some of the knitting skills you need to know before getting started:
- Knit Flat (Back & Forth)
- Knit & Purl Stitches
There’s no shaping, increase or decrease stitches.
In this pattern, you’ll be alternating blocks of stockinette stitch and reverse stockinette stitch to get a seamless quilted farmhouse style shrug cardigan.
WHAT’S TO LOVE!?
- Relatively quick project
- A seamless knitted quilt
- Simple & easy construction
- Beginner skill level
- Video tutorial to help you seam the sleeves
Yarn & Substitutions
- Yarn Weight: Bulky (chunky yarn)
- Yardage: 375 – 875 yds (342 – 800 meters)
- Suggested Yarn: Lion Brand Hue + Me in Haze
Hue + Me is a bulky weight acrylic and wool blend yarn. I’ve enjoyed knitting with it and it’s soft enough. It’s not cashmere or silk, I’d call it more of a rustic yarn. It’s not itchy, but it’s not super soft either, just somewhere in the middle. I love the weight of it and haven’t found a perfect substitute.
So, I went to the library aka YarnSub.com to see what they suggest. One that they recommend is Berroco Vintage Chunky, which just so happens to be one of my current favorite yarns. In my opinion, it’s a little thin for a direct substitute, but it might work if you pair it with a fingering weight yarn maybe even a different color adding some depth, creativity and uniqueness.
There are a few recommendations for different Knit Picks yarns that I need to try!
Expert tip: When using a yarn substitute, I highly recommended knitting a swatch to know your gauge.
Thanks to this chunky yarn it’s a relatively quick project too!
Needles & Notions
- US size 10.5 (6.5 mm) Circular Knitting Needles with a 32” (80cm) Cable, or longer
- Darning Needle
- Tape Measure
- Scissors
Gauge
11 STS & 16 rows per 4” (10 cm) square, knit in the stockinette stitch pattern
Measurements
- Model is 5’9″/175cm, 130lbs with a 33″/84cm chest, 27″/68cm waist wearing a 45″ width poncho with mid-rise jeans.
- Number of CO stitches: 113
- Measurements (before blocking): 35″ x 40″ wide (81cm x 101cm)
- Measurements (steam blocked): 34″ x 43″ wide(86cm x 109cm)
- Weight: 1lb. 2.7 oz (530 grams)
Sizes
- Size S/M: 30 x 34” (76-86cm), CO 91 STS, 3-4 skeins
- Size L/XL: 34 x 43” (86-109cm), CO 113 STS, 4-5 skeins
- Size 2/3XL: 38 x 51” (97-129cm), CO 135 STS, 6-7 skeins
This pattern is easily customizable. Make it longer or shorter depending on your bust & waist sizes & style. For a larger bust or waist you may want to make it a little wider and/or longer, depending on your size & style. ;)
Notes
- Not reversible.
- Knit top down.
- Knit using the broken rib stitch, rib stitch & garter stitch.
- The CO edge is the width, across your shoulders.
- This is a rectangle with the sides sewn to create “sleeves.”
- This is a custom pattern, made to fit your body and your style.
- A circular needle is used to accommodate the large number of CO stitches.
Download & Print this Pattern
Do you enjoy working from a paper copy? Get the downloadable, printer-friendly PDF completely ad-free.
That way you can have lifetime access to it and download it to any device and view it from anywhere, without ads (and the pattern might not be around forever).
Modification Options
You can knit this using a worsted weight yarn, but you’ll need to cast-on more stitches. Maybe try going up one size, so if you were going to knit a L/XL in bulky, knit a 2XL/3XL using the worsted weight yarn. That’s a good place to start. :)
If you enjoy knitting squares and seaming them together, you can recreate this using individual squares and seaming it together.
Another option would be, not to seam it and leave it as a throw blanket! ;)
Knitting Abbreviations
*– * – repeat between * to end of round
BO – bind-off in pattern
CO – cast-on (long-tail cast-on method)
K – knit stitches (K1 means to knit 1 stitch)
P – purl stitches (P2 means to purl 2 stitches)
PM – place marker
STS – stitches
S/M Free Pattern Instructions
 |
 |
 |
Knit Flat, Back & Forth, Row-by-Row:
Size S/M: 30 x 34” (76-86cm)
Knit Flat, Back & Forth, Row-by-Row:
CO 91 STS
Collar Ribbing (about 2”/5cm):
Row 1, 3, 5, 7 (WS): K7 *K2, P2* last 8 sts: K1, K7
Detailed Instructions:
Knit the first 7 stitches, repeat in the K2, P2 pattern until you have 8 stitches remaining and then knit the last 8 stitches.
Row 2, 4, 6 (RS): K7, P1 *K2, P2* last 7 sts: K7
Detailed Instructions:
Knit the first 7 stitches, purl 1 stitch, repeat in the K2, P2 pattern until you have 7 stitches remaining, and then knit the last 7 stitches.
Optional: Place a stitch marker after the first 7 sts and before the last 7 sts for a physical reminder where the border starts and ends. Slip the stitch marker as you come to them.
Body section:
Now you’re ready to start knitting squares seamlessly!
For the size S/M, you’ll have 7 knitted squares
Rows 8, 10, 12, 14, 16, 18, 20 (RS): K7 *K11, P11* last 18 sts: K11, K7
Detailed Instructions:
Knit the first 7 stitches, repeat in the K11, P11 pattern until you have 18 stitches remaining, and then knit the last 18 stitches.
Rows 9, 11, 13, 15, 17, 19 (WS): K7 *P11, K11* last 18 sts: P11, K7
Detailed Instructions:
Knit the first 7 stitches, repeat in the P11, K11 pattern until you have 18 stitches remaining, purl 11 stitches and then knit the last 7 stitches.
Rows 21, 23, 25, 27, 29, 31, 33 (WS): K7 *K11, P11* last 18 sts: K11, K7
Detailed Instructions:
Knit the first 7 stitches, repeat in the K11, P11 pattern until you have 18 stitches remaining, and then knit the last 18 stitches.
Rows 22, 24, 26, 28, 30, 32 (RS): K7 *P11, K11* last 18 sts: P11, K7
Detailed Instructions:
Knit the first 7 stitches, repeat in the P11, K11 pattern until you have 18 stitches remaining, purl 11 stitches and then knit the last 7 stitches.
Repeat rows 8-33, 3 more times
For a total of 8 patchwork rows
Bottom Ribbing (about 2”/5cm):
Row 1, 3, 5 (WS): K7 *K2, P2* last 8 sts: K1, K7
Detailed Instructions:
Knit the first 7 stitches, repeat in the K2, P2 pattern until you have 8 stitches remaining and then knit the last 8 stitches.
Row 2, 4, 6 (RS): K7, P1 *K2, P2* last 7 sts: K7
Detailed Instructions:
Knit the first 7 stitches, purl 1 stitch, repeat in the K2, P2 pattern until you have 7 stitches remaining, and then knit the last 7 stitches.
Row 7 (RS): BO in pattern, knitting into the knit stitches and purling into the purl stitches.
L/XL Pattern:
Size L/XL: 34 x 43” (86-109cm)
Knit Flat, Back & Forth, Row-by-Row:
CO 113 STS
Collar Ribbing (about 2”/5cm):
Row 1, 3, 5, 7 (WS): K7 *K2, P2* last 10 sts: K2, P1, K7
Detailed Instructions:
Knit the first 7 stitches, repeat in the K2, P2 pattern until you have 10 stitches remaining, knit the next 2 stitches, purl 1 stitch and then knit the last 7 stitches.
Row 2, 4, 6 (RS): K7, K1, P2 *K2, P2* last 7 sts: K7
Detailed Instructions:
Knit the first 7 stitches, knit 1 stitch, purl 2 stitches, repeat in the K2, P2 pattern until you have 7 stitches remaining, and then knit the last 7 stitches.
Optional: Place a stitch marker after the first 7 sts and before the last 7 sts for a physical reminder where the border starts and ends. Slip the stitch marker as you come to them.
Body section:
Now you’re ready to start knitting squares seamlessly!
For the size L/XL, you’ll have 9 knitted squares
Rows 8, 10, 12, 14, 16, 18, 20 (RS): K7 *K11, P11* last 18 sts: K11, K7
Detailed Instructions:
Knit the first 7 stitches, repeat in the K11, P11 pattern until you have 18 stitches remaining, and then knit the last 18 stitches.
Rows 9, 11, 13, 15, 17, 19 (WS): K7 *P11, K11* last 18 sts: P11, K7
Detailed Instructions:
Knit the first 7 stitches, repeat in the P11, K11 pattern until you have 18 stitches remaining, purl 11 stitches and then knit the last 7 stitches.
Rows 21, 23, 25, 27, 29, 31, 33 (WS): K7 *K11, P11* last 18 sts: K11, K7
Detailed Instructions:
Knit the first 7 stitches, repeat in the K11, P11 pattern until you have 18 stitches remaining, and then knit the last 18 stitches.
Rows 22, 24, 26, 28, 30, 32 (RS): K7 *P11, K11* last 18 sts: P11, K7
Detailed Instructions:
Knit the first 7 stitches, repeat in the P11, K11 pattern until you have 18 stitches remaining, purl 11 stitches and then knit the last 7 stitches.
Repeat rows 8-33, 3 times.
Repeat rows 8-20 1 more time
For a total of 9 patchwork rows
Bottom Ribbing (about 2”/5cm):
Row 1, 3, 5, (WS): K7 *K2, P2* last 10 sts: K2, P1, K7
Detailed Instructions:
Knit the first 7 stitches, repeat in the K2, P2 pattern until you have 10 stitches remaining, knit the next 2 stitches, purl 1 stitch and then knit the last 7 stitches.
Row 2, 4, 6 (RS): K7, K1, P2 *K2, P2* last 7 sts: K7
Detailed Instructions:
Knit the first 7 stitches, knit 1 stitch, purl 2 stitches, repeat in the K2, P2 pattern until you have 7 stitches remaining, and then knit the last 7 stitches.
Row 7 (RS): BO in pattern, knitting into the knit stitches and purling into the purl stitches.
2/3XL Pattern:
Size S/M: 38 x 51” (94-129cm)
Knit Flat, Back & Forth, Row-by-Row:
CO 135 STS
Collar Ribbing (about 2”/5cm):
Row 1, 3, 5, 7 (WS): K7 *K2, P2* last 8 sts: K1, K7
Detailed Instructions:
Knit the first 7 stitches, repeat in the K2, P2 pattern until you have 8 stitches remaining and then knit the last 8 stitches.
Save this pattern for later!
Row 2, 4, 6 (RS): K7, P1 *K2, P2* last 7 sts: K7
Detailed Instructions:
Knit the first 7 stitches, purl 1 stitch, repeat in the K2, P2 pattern until you have 7 stitches remaining, and then knit the last 7 stitches.
Optional: Place a stitch marker after the first 7 sts and before the last 7 sts for a physical reminder where the border starts and ends. Slip the stitch marker as you come to them.
Body section:
Now you’re ready to start knitting squares seamlessly!
For the size 2/3XL, you’ll have 11 knitted squares
Rows 8, 10, 12, 14, 16, 18, 20 (RS): K7 *K11, P11* last 18 sts: K11, K7
Detailed Instructions:
Knit the first 7 stitches, repeat in the K11, P11 pattern until you have 18 stitches remaining, and then knit the last 18 stitches.
Rows 9, 11, 13, 15, 17, 19 (WS): K7 *P11, K11* last 18 sts: P11, K7
Detailed Instructions:
Knit the first 7 stitches, repeat in the P11, K11 pattern until you have 18 stitches remaining, purl 11 stitches and then knit the last 7 stitches.
Rows 21, 23, 25, 27, 29, 31, 33 (WS): K7 *K11, P11* last 18 sts: K11, K7
Detailed Instructions:
Knit the first 7 stitches, repeat in the K11, P11 pattern until you have 18 stitches remaining, and then knit the last 18 stitches.
Rows 22, 24, 26, 28, 30, 32 (RS): K7 *P11, K11* last 18 sts: P11, K7
Detailed Instructions:
Knit the first 7 stitches, repeat in the P11, K11 pattern until you have 18 stitches remaining, purl 11 stitches and then knit the last 7 stitches.
Repeat rows 8-33, 4 more times
For a total of 10 patchwork rows
Bottom Ribbing (about 2”/5cm):
Row 1, 3, 5 (WS): K7 *K2, P2* last 8 sts: K1, K7
Detailed Instructions:
Knit the first 7 stitches, repeat in the K2, P2 pattern until you have 8 stitches remaining and then knit the last 8 stitches.
Row 2, 4, 6 (RS): K7, P1 *K2, P2* last 7 sts: K7
Detailed Instructions:
Knit the first 7 stitches, purl 1 stitch, repeat in the K2, P2 pattern until you have 7 stitches remaining, and then knit the last 7 stitches.
Row 7 (RS): BO in pattern, knitting into the knit stitches and purling into the purl stitches.
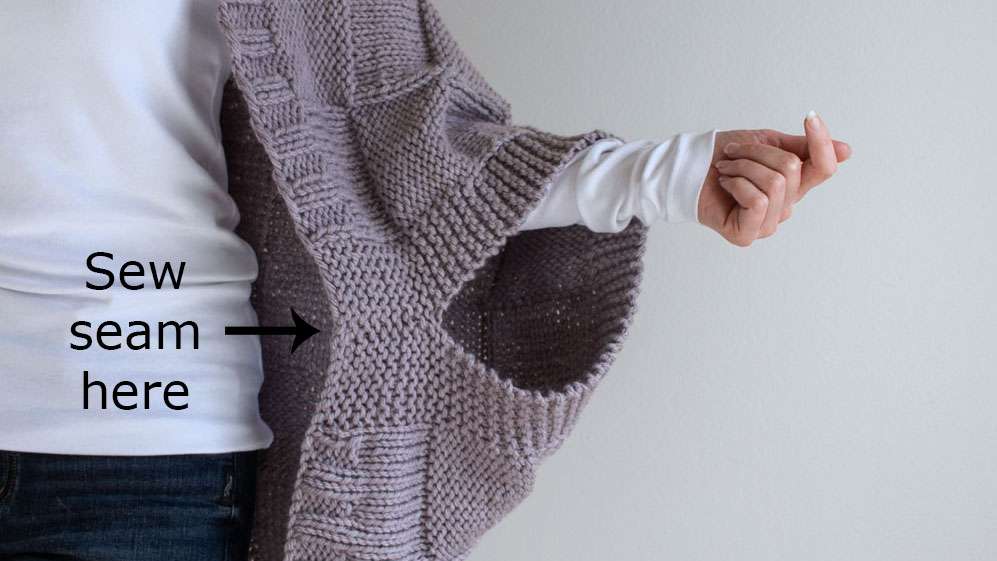
How to Create the Sleeves / Armholes
You’ll be sewing 2 short seams on each side to create the sleeves.
Detailed Instructions:
Lay it flat, with the wrong side up.
On a short side, fold the CO and BO corners together.
Sew the left side & right side edges together (not the CO & BO edges) from the outside in, creating one sleeve. To sew the seam, I went through the protruding loops of the garter stitches, which you can watch the video tutorial below, or you can use the whip stitch.
Whichever method you choose is the best method, because it’s the one that gets the job done. :)
How far up you sew depends on the size you’re making. I sewed mine about 6” (15cm).
Repeat on the other side.
Weave in the ends.
Video Tutorial : Seam the Sleeves
Steam Blocking
Blocking is optional, however I recommend steam blocking it. I steam blocked mine and felt that it gave it a more professional finish and relaxed drape.
Expert tip: If it’s a little smaller than you’d like, steam blocking will help relax the stitches and it’ll grow an inch or two.
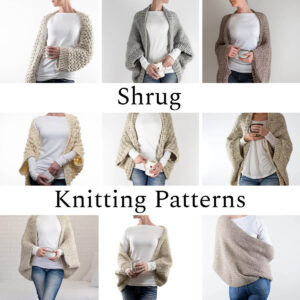
More knitted shrug patterns that you’ll love

|
|
|
|